Thanks to Eva Teo for ordering these Chocolate Chips Cookies for her son's birthday party. I have personalized them with his name on exclusively designed cards and tagged to each pack of cookies. Hope he likes the cookies and have a wonderful party.
BeautyMe Love Recipes
Thursday, May 23, 2013
Chocolate Chips Cookies - Orders (2013)
Baked on 20 May 2013
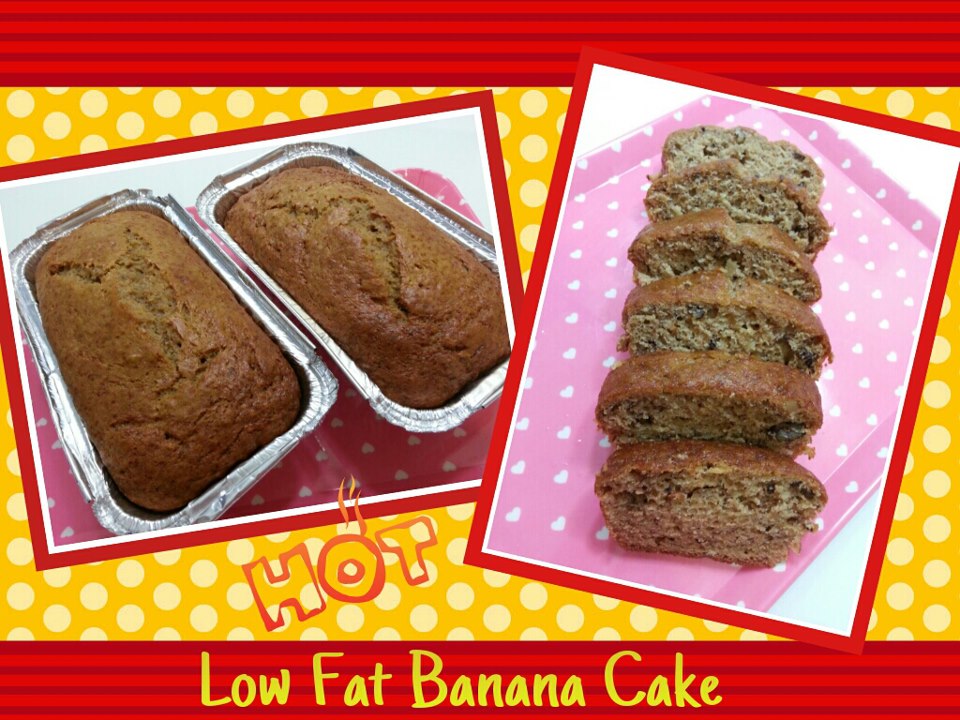
Low Fat Banana Cake
![]() |
| Baked on 20 May 2013 |
I always wanted to bake banana cake that are moist and with the sweet banana flavors and I am so glad that I finally made it! This is the best banana cake I have made so far and those who tried it also agreed with me. The important tip to make a good banana cake is to use bananas that are very ripe (those with many black spots on the skin). You will be amazed that it will bring out an excellent sweetness and banana flavors. Give it a try and I am sure you will like it too.
Ingredients
240g mashed ripe bananas (about 2 large bananas)
1 tsp baking soda
120g low-fat plain yogurt
60g canola, vegetable, or corn oil
120g light brown sugar
1 large egg (60 grams)
1 tsp vanilla essence
200g plain flour
1/2 tsp ground cinnamon
1 tsp baking powder
1/4 tsp salt
80g Walnuts
80g Walnuts
Directions
1. Preheat oven to 180 deg C and grease 2 loaf pans with oil.
2. In a large bowl, mix the mashed bananas with the baking soda and
yogurt. Allow to sit while you prepare the rest of the batter.
3. Meanwhile, whisk together the oil, sugar,
egg and vanilla till well mix.
4. In another large bowl, sift together the flours, baking powder,
ground cinnamon and salt.
5. Add the banana mixture into the oil mixture and mix till just combined, Then
add the flour mixture and mix well.
6. Add in walnuts and stir until all the ingredients are combined.
7. Pour into the prepared pan and smooth the top. Bake for about 45 -55 minutes,
or until a toothpick inserted in the center of the loaf comes out clean.
Chocolate Cake - Orders (2013)


Baked on 15 May 2013
Thanks to Liz for ordering this Chocolate cake from me for a colleague who was leaving the company. Hope she likes the cake.
Baked on 17 May 2013
Vanilla & Chocolate layers Sponge Cake with Peach toppings & Sponge Fingers
Baked on 11 May 2013 for Mother's Day Celebration
I was tasked to bake a cake for our extended Family Mother's Day Celebration and I thought of something with fruits would be more well-liked by all Mothers.
So I decided to bake this Vanilla & Chocolate layers Sponge Cake with Peach toppings, cream cheese frosting for creaming the cake and decorated the sides with sponge fingers. The finished cake looked so gorgeous! Everyone loved the cake and within seconds, the whole cake was gone.
I was really happy to receive all the compliments for this cake, indeed a great project for me, yippee!
Cake In A Jar
Baked this on 11 May 2013
I have decided to create my own "Cake in A Jar" after I came across an interesting shop that sells this (they have different cake & cream content in it). I think this could be a great gift for close friends as it's very presentable and perhaps adding a little personal touch with their name on it would be even perfect!
I baked a Chocolate Sponge Cake and placed small parts of cake (press down a little) in the jar between a layer of Cream Cheese frosting. I also threw in some chocolate flakes on the last layer of cream cheese frosting, so as to add a little more chocolaty taste to the cake.
I kept this "Cake in A Jar" in the fridge since there was cream cheese content in it. Amazingly, the cake was still very spongy and soft even after 2 days.
Give it a try and let your creative juice run wild on & in the jar.
God's Calling
It had been quite a while that I have not updated my blog as I have been very busy lately sorting out my new career path. I guess this could be God's calling for me to start working on the dream that I had all along and I am going to give it a shot :)
You will be seeing alot of my bakes updates coming up soon!
Saturday, May 4, 2013
Cavan's 11th Birthday on 5 May 2013
![]() |
| Celebrating Cavan's 11th Birthday with Mummy's special made mini cupcakes, brownies, fruit tarts and a Lego M&M cake. |
Sunday, April 28, 2013
Mini Mixed Fruits & Chocolate Chips Muffins
This past week was indeed a very busy week for me and I didn't got the chance to plan what to bake for the weekends. I have a quick look at some recipes in the blog and came across this recipe (from Happy Home Baking) which I could use up my mixed fruits and chocolate chips in my fridge. However, I decided to make some changes to the recipe. The recipe called for raisins but I replaced raisins with mixed fruits. I soaked them in hot water and drained dry so they will be soft in the cake. I added the mixed fruits only after I poured the liquid mixture to the dry mixture. I have also reduced the sugar further from original 150g to 100g as I felt the flavoured chocolate chips would be sweeter than dark chocolate.
I have made 2 attempts in preparing the liquid mixture (for direction no. 5) as the first attempt, the mixture was lumpy and did not look right to me. In my 2nd attempt, I melted the butter and cool a little. Then I stirred in the sugar first, followed by adding the milk and stirring a little. Lastly, I added the egg and mixed it well. The consistent looked more convincing this round.
The texture was soft and the sweetness was just right. The mixed fruits and chocolate chips compliment each other well in these muffins. Perhaps, the next time I will add my favourite walnuts to have a little crunch to the muffins.
Ingredients
250g plain flour1 1/2 tsp baking powder
1/2 tsp baking soda
80g chocolate chips
150g mixed fruits
1 egg (lightly beaten)
60g butter
175ml milk
100g sugar (reduced from 150g)
Directions
1. Pre-heat oven to 180 deg C.
2. Soaked mixed fruits in hot water for 20mins, drained and dry with kitchen towel, set aside.
3. Melt butter in a saucepan, over low heat, set aside to cool.
4. Sieve together flour, baking powder and baking soda into a mixing bowl.
5.Add chocolate chips and mix with a spatula. Make a well in the centre.
6. Add sugar to the melted butter and stir. Follow by adding milk and mix. Lastly add egg and mix until thoroughly combined.
7. Pour the liquid mixture into the flour and add mixed fruits. With the spatula, gently fold all the ingredients to form a wet batter. Just mix until the flour are incorporate into the batter. DO NOT Over mix.
8. Spoon batter into paper muffin cups. Bake for 20-25mins.
9. Let cool on a wire rack.
2. Soaked mixed fruits in hot water for 20mins, drained and dry with kitchen towel, set aside.
3. Melt butter in a saucepan, over low heat, set aside to cool.
4. Sieve together flour, baking powder and baking soda into a mixing bowl.
5.Add chocolate chips and mix with a spatula. Make a well in the centre.
6. Add sugar to the melted butter and stir. Follow by adding milk and mix. Lastly add egg and mix until thoroughly combined.
7. Pour the liquid mixture into the flour and add mixed fruits. With the spatula, gently fold all the ingredients to form a wet batter. Just mix until the flour are incorporate into the batter. DO NOT Over mix.
8. Spoon batter into paper muffin cups. Bake for 20-25mins.
9. Let cool on a wire rack.
Saturday, April 20, 2013
Chocolate Cake/Cupcakes (2)
When I first saw this recipe, I really liked the looks of the chocolate cupcakes with the spongy texture and so I decided to give it a try. Indeed, it was really exactly how they were as in the picture. Amazingly, this recipe does not use any oil or butter and no folding required as well but yet still can yield such a soft & spongy texture.
Initially, I planned to bake a Birthday Cake (with Classic Sponge Cake) for my maid's birthday but after trying out these chocolate cupcakes, I have changed my mind to use this recipe instead. I also used another good recipe to do the ganache to coat the cake and an exclusive Birthday Cake was created. My maid was very surprised and happy that I made this chocolate cake (even though she knows that I don't like chocolate) for her.
Ingredients
2 eggs (room temperature)1 egg yolk (room temperature)
55g sugar
a little salt
36g milk
50g self raising flour
10g cocoa powder
Ganache (for cake)
75g whipping cream (I used Enborg)
150g couverture dark chocolate
20g butter
Directions
1. Preheat oven at 170 deg C.
2. Whisk eggs and egg yolk, sugar and salt till pale and ribbon stage.
3. Add milk, follow by flour and cocoa powder until just combined. Do not over beat.
4.Fill the cupfillers 3/4 full and bake for 15mins.
Ganache For Cake : Cook whipping cream till boil. Add dark chocolate, stir until completely melts. Add in butter, mix until well combined. Leave aside to cool and spread over cake. Decorate cake and keep ready cake in the fridge.
2. Whisk eggs and egg yolk, sugar and salt till pale and ribbon stage.
3. Add milk, follow by flour and cocoa powder until just combined. Do not over beat.
4.Fill the cupfillers 3/4 full and bake for 15mins.
Ganache For Cake : Cook whipping cream till boil. Add dark chocolate, stir until completely melts. Add in butter, mix until well combined. Leave aside to cool and spread over cake. Decorate cake and keep ready cake in the fridge.
Sunday, April 14, 2013
Chocolate Cupcakes
I was so attracted to the colourful fillers when I saw this recipe from Nasi Lemak Lover. I have bought some colourful fillers from BIY and could not wait to try them. However, the result was not up to my expectation. The fillers did not look bright after baking. Nevertheless, my kids enjoyed the cupcakes, not bothering by the colour of the fillers at all. I felt the texture was soft but too chocolaty for me.
Ingredients
125g butter80g sugar
3 eggs115g cake flour
20g cocoa powder
1 tsp baking powder
4 tbsp yoghurt
Directions
1. Line cupcake fillers on cake pan and preheat oven 180 deg C.
2. Sift flour, cocoa powder and baking powder.
3. Beat butter and sugar till fluffy and pale.
4. Add in egg one at a time, mix well.
5. Add in flour and yoghurt alternately.
6. Spoon batter into fillers, sprinkle chocolate rice on top.
7. Bake at 180 deg C for 20-25 mins.
2. Sift flour, cocoa powder and baking powder.
3. Beat butter and sugar till fluffy and pale.
4. Add in egg one at a time, mix well.
5. Add in flour and yoghurt alternately.
6. Spoon batter into fillers, sprinkle chocolate rice on top.
7. Bake at 180 deg C for 20-25 mins.
Vanilla Almond Cupcakes
My colleague keeps reminding me to make almond cakes for her as she is one great lover of almond and I found this recipe that she might like it. The recipe said its light but I felt that it is quite a heavy cake (like pound cake type which my son likes). I like the almond meal in the cake and the crispy almond flakes when they are out of the oven but not sure if the texture will still be nice & soft the next day. Will get her to comment on it.
Ingredients
2 eggs (large)80g sugar
A pinch of salt
1 tsp vanilla extract
50g almond powder
80g cake flour
2/3 tsp baking powder
70g melted butter
35g sliced almond
Directions
1. Preheat the oven to 170 deg C.
2. Line the tins with paper fillers.
3. Sift the flour and baking powder together, set aside
4. Whisk the eggs, salt and vanilla extract until lighten add the sugar gradually until very light in colour.
5. Add the almond powder and flour into the eggs mixture.
6. Fold in the melted butter.
7. Spoon into prepared tins, and sprinkle with sliced almonds.
8. Bake for 20-25mins, or until cake spring back when touched lightly.
2. Line the tins with paper fillers.
3. Sift the flour and baking powder together, set aside
4. Whisk the eggs, salt and vanilla extract until lighten add the sugar gradually until very light in colour.
5. Add the almond powder and flour into the eggs mixture.
6. Fold in the melted butter.
7. Spoon into prepared tins, and sprinkle with sliced almonds.
8. Bake for 20-25mins, or until cake spring back when touched lightly.
Sunday, April 7, 2013
Mini Oreo Cheese Cupcakes
I decided to give this Oreo Cheesecake a try when I saw the recipe from Happy Home Baking. Happy Homemaker used the larger Oreo cookies, placed them at the base of the fillers and serve it upside down. I thought this is a brilliant idea but I decided to try with mini oreo cookies instead (for bite size). I tried placing the mini oreo cookies at the base of my fillers, nevertheless the fillers were much too big than the mini oreo cookies and it will not be pretty when I turn it over. So I had no choice but to place the mini oreo cookies on top instead. Still, it looked presentable.
Ingredients
35 mini Oreo Cookies (8pcs remove cream and coarsely chopped)225g cream cheese
40g caster sugar (I reduced from 50g)
1/2 tsp vanilla extract
![]() |
| Place mini oreo cookies on top of batter |
60g plain yoghurt
Directions
1. Preheat oven at 135 deg C.
2. Beat cream cheese with an electric mixer until smooth.
3. Add in sugar, beat until just combined and then add vanilla extract.
4. Gradually drizzle in the egg, beat to combine.
5. Add in yoghurt, beat till just combined and mix in chopped cookies.
6. Fill each muffin fillers almost to the brim. Place mini oreo cookies on top of batter. Bake for 20-25mins until filling is set and not jiggly. Transfer to wire rack, leave to cool completely. Store in airtight containers and leave to refrigerate at least 4 hrs or overnight.
2. Beat cream cheese with an electric mixer until smooth.
3. Add in sugar, beat until just combined and then add vanilla extract.
4. Gradually drizzle in the egg, beat to combine.
5. Add in yoghurt, beat till just combined and mix in chopped cookies.
6. Fill each muffin fillers almost to the brim. Place mini oreo cookies on top of batter. Bake for 20-25mins until filling is set and not jiggly. Transfer to wire rack, leave to cool completely. Store in airtight containers and leave to refrigerate at least 4 hrs or overnight.
Saturday, April 6, 2013
Orange Sponge Cupcakes
I came across a recipe book recently that designed cupcakes with beautiful patterns on them before steaming and I was curious whether it could apply to baking as well. When I saw this Orange Sponge Cupcake recipe with the flat top, I immediately knew that I could do the experiment with this. I used melting chocolate to pipe some patterns on top of batter to see if the chocolate would still stay after baking and it really did! I would say this is indeed an easy recipe with a perfect nice top to play with designs. The texture was soft, however we could add in some orange zest to better enhance the orange flavor.
![]() |
| Decorate with melting chocolate on top of batter before baking |
Ingredients
3 eggs50g sugar
60g cake flour
18g orange Juice
18g corn oil
some melting chocolate for decorating
Directions
1. Whisk egg and sugar till ribbon stage.
2. Add in sifted flour and mix until just combined.
3. Mix corn oil and orange juice together. Add into the batter in 2 additions and mix until just combined (do not over beat). Scoop the batter into cup fillers till 3/4 full.
4. Melt chocolate in microwave and put into a piping bag. Pipe designs on top of batter.
6. Bake at 180 deg C for 20-25mins.
2. Add in sifted flour and mix until just combined.
3. Mix corn oil and orange juice together. Add into the batter in 2 additions and mix until just combined (do not over beat). Scoop the batter into cup fillers till 3/4 full.
4. Melt chocolate in microwave and put into a piping bag. Pipe designs on top of batter.
6. Bake at 180 deg C for 20-25mins.
Corn Chicken Soup

My family love this soup very much as it was delicious with the sweetness from the corn and the well combination with chicken meat. The egg shreds also added a beautiful look to the soup.
I am submitting this post to Little Thumbs Up for April 2013 event with the theme on "Corn" organised by Zoe (Bake for Happy Kids) and Mui Mui (My Little Favourite DIY) and hosted by Esther (Copycake Kitchen).

Ingredients
200g chicken breast meat1 cube chicken Knorr
1/2 can kennel corn
1 tbsp corn flour (mix with 3 tbsp water)
1 egg
some spring onions
pepper & salt
Directions
1. Rinse chicken breast and cut int small long strips.
2. Fill pot with 1200ml of water, add in chicken cubes and bring to boil.
3. Add corn and stir well, then add chicken.
4. Add cornflour mixture and stir gently to thicken.
5. Beat eggs and mix well with 2 tbsp water, slowly pour into soup till egg separate into shreds on the surface and turn off heat.
6. Sprinkle spring onions, pepper and salt before serving.
2. Fill pot with 1200ml of water, add in chicken cubes and bring to boil.
3. Add corn and stir well, then add chicken.
4. Add cornflour mixture and stir gently to thicken.
5. Beat eggs and mix well with 2 tbsp water, slowly pour into soup till egg separate into shreds on the surface and turn off heat.
6. Sprinkle spring onions, pepper and salt before serving.
Sunday, March 31, 2013
Peach Tarts
I found this recipe (from Happy Home Baking) quite interesting and pretty with the peaches on it. Though it took some time getting the base done first and then wait for it to cool before adding the fillings, looking at the finished tart was all worth.
I did not notice the tart pan mentioned in the recipe was 18cm and by the time I was about to place the dough onto my tart pan, then I realised my pan was 24cm. Too late to do anything, so I went ahead to mould it with whatever dough I had and I managed to spread it out thinly and evenly.
The tart base was indeed very crusty and the almond filling tasted nice too. However, there was a down side with this tart-it was not easy to remove the pastry from the base of the pan even though I have greased it thoroughly. I guess I will need to place parchment paper on the base the next time I bake.
Ingredients
Pastry :80g cake flour / plain flour
20g ground almond powder
30g caster sugar
40g butter (softened)
1 tbsp (15g) lightly beaten egg
Filling:
10g cake flour / plain flour
80g ground almond
50g brown sugar
60g butter (softened)
1 egg (lightly beaten)

Some canned peach slices (drained)
Icing sugar for dusting
Directions
1. Grease tart pan (18cm).
2. Toast ground almond (20g & 80g) at 100 deg C, stiring in between and let it cool.
3. Sift flour and add ground almond to flour.
4. Cream butter and sugar until light and fluffy.
5. Add in the egg very gradually, whisking the batter till well mixed each time egg is added.
6. Add flour & almond mixture in 2 to 3 addition into the batter until just well combined.
7. Place dough in tart pan and spread out the dough all over the pan, smoothing the edge and rim.
8. Chill pastry in fridge for 20mins.
9. Use a fork to poke holes on the pantry and brush top of rim with egg wash. Bake in preheated oven at 180 deg C for 10-15mins until the edges are slightly browned. Let cool completely.
10. For filling: cream butter and brown sugar till mixture turns fluffy. Add in egg gradually, mix well each time the egg is added.
11. Add in ground almond and flour, mix well.
12. Spread the filling onto the cooled pastry base. Line with peach slices and baked at 170 deg C for 35-40mins until edges and filing turn golden brown. Let cool and dust with icing sugar.
2. Toast ground almond (20g & 80g) at 100 deg C, stiring in between and let it cool.
3. Sift flour and add ground almond to flour.
4. Cream butter and sugar until light and fluffy.
5. Add in the egg very gradually, whisking the batter till well mixed each time egg is added.
6. Add flour & almond mixture in 2 to 3 addition into the batter until just well combined.
7. Place dough in tart pan and spread out the dough all over the pan, smoothing the edge and rim.
8. Chill pastry in fridge for 20mins.
9. Use a fork to poke holes on the pantry and brush top of rim with egg wash. Bake in preheated oven at 180 deg C for 10-15mins until the edges are slightly browned. Let cool completely.
10. For filling: cream butter and brown sugar till mixture turns fluffy. Add in egg gradually, mix well each time the egg is added.
11. Add in ground almond and flour, mix well.
12. Spread the filling onto the cooled pastry base. Line with peach slices and baked at 170 deg C for 35-40mins until edges and filing turn golden brown. Let cool and dust with icing sugar.
Saturday, March 30, 2013
Blueberry Lemon Friands
I really have to thank my colleague, Rachel for spotting this recipe (from Anncoo Journal) for me as she was very sure that my son will like these friands and true enough he really did, so did my girl, MIL and maid too! They all cannot stop with 1 pc and ended up eating many more. I actually tried out with 1/2 of the recipe only, using my mini muffin pans and it yield 30pcs.
I was pondering why I could not pour the batter directly into the fillers (just like cupcakes), so I tested a few pcs with the batter poured into the fillers and I got the answer after baking - I am not able to separate the friands from the fillers haha...
These friands were really fantastic, not greasy, tasted great with the blueberry and had a refreshing taste from the lemon zest. They tasted even better the next day.
Ingredients
30g Plain flour45g Icing sugar
1/2 tbsp lemon zest
75g Ground almond
100g butter (melted & cooled)
75g Blueberries
3 (100g) Egg whites (lightly beaten)
Extra icing sugar for dusting
Directions
1. Preheat oven to 190 deg C. Grease mini muffins pan with butter.
2. Sift flour and icing sugar into a large bowl and add lemon zest and ground almond. Stir to combine evenly and make a well in the centre.
3. Add the egg whites and butter to the dry ingredients and stir until just combined with a hand whisk, do not overbeat. Then flold in the blueberries with a rubber spatula.
4. Spoon mixture into prepared pan and bake for 30mins until well risen and golden.
5. Leave the friands in the pan for 5 mins before lifting out onto a wire rack to cool.
6. Serve friands dusted with icing sugar.
2. Sift flour and icing sugar into a large bowl and add lemon zest and ground almond. Stir to combine evenly and make a well in the centre.
3. Add the egg whites and butter to the dry ingredients and stir until just combined with a hand whisk, do not overbeat. Then flold in the blueberries with a rubber spatula.
4. Spoon mixture into prepared pan and bake for 30mins until well risen and golden.
5. Leave the friands in the pan for 5 mins before lifting out onto a wire rack to cool.
6. Serve friands dusted with icing sugar.
Friday, March 29, 2013
Fun Egg Toast
I was contemplating what meatless meal I could cook on Good Friday, and when I saw this recipe from Happy Home Baking, I knew that this would definitely be the perfect dish! Same with Happy Homebaker, my youngest daughter also did not like the egg yolk in sunny-side-up, so I lightly beaten the egg and pour it over the cheese and indeed she loves it. Everyone enjoyed the wonderful meatless lunch today, yippee!
Ingredients
BreadEgg
Cheese
Black pepper
Oregano flakes (I don't have dried parsley)Some butter to spread
Directions
1. Place a slice of bread on a tray and place a slice of cheese on top of bread. Cut along 4 sides of cheese (but don't cut through) to get a square in the middle. With the back of spoon, press and flatten the bread.
2. Spread some butter along the sides of bread (to prevent the sides of toast from getting brown faster than the egg). Place a slice of cheese, press it down a little and then place an egg top of it.
3. Bake at 180 deg C for 20mins or until the egg is set.
4. Sprinkle with some pepper and oregano flakes and ready to serve.
2. Spread some butter along the sides of bread (to prevent the sides of toast from getting brown faster than the egg). Place a slice of cheese, press it down a little and then place an egg top of it.
3. Bake at 180 deg C for 20mins or until the egg is set.
4. Sprinkle with some pepper and oregano flakes and ready to serve.
Sunday, March 24, 2013
Butterflied Prawns in Garlic-Parsley Butter
This is my last submission for this month from Delia Smith-Butterflied Prawns in Garlic-Parsley Butter. These prawns really tasted great with the seasoning of butter, garlic, parsley and lemon. Though the preparation did take a bit of time but the effort was worth with the smile on everyone faces at the dinner table.
I am submitting this post to "Cook like a Star" with this month featured chef Delia Smith, organised by Bake for Happy Kids, Piece of Cake and Eat your heart out.
I want to say that I have learnt a lot from Delia Smith on the various recipes that I have experimented and there are many more recipes I could learn. Also, many thanks to Zoe from Bake for Happy Kids, Mich from Piece of Cake and Baby Sumo from Eat your heart out for selecting such a good chef, Delia Smith, for this event.
This recipe is listed on Very Good Recipes.
Recipe adapted from Delia Smith
(with my modification in blue)
Ingredients
10pcs large prawn (I used 10 large prawns)1 tsp salt
3 cloves garlic, peeled
1 handful of Italian parsley
50g salted butter
Salt and freshly milled black pepper
1 tbsp lemon juice
Directions
1. Using a pair of sharp kitchen scissors, snip off the sharp, pointy spike and trim off the prawn legs. Cut the prawns shell along the middle of its back all the way to the end of tail to get an incision. Slice the prawn to make a deeper incision, taking care not to cut all the way through the shell. Rinse the prawn and remove the intestinal track. Open the prawn up like a butterfly and press it down gently so that it stays open. Lay the prawn on a baking tray lined with parchment paper.
2. Pound the garlic cloves, parsley and salt into a paste form. Combine the paste with softened butter and season with black pepper. Add in lemon juice and spread the butter mixture onto the prawns.
3. Preheat the oven at 230 deg C and bake prawn for 25mins* until the prawns are pink and opaque. Serve garnished with chopped parsley and lemon wedges on the side.
* I tried baking for 5-7 mins as stated in Delia's instruction but the prawns were not fully cooked, so I continued to bake for another 20mins till it was completely done.
2. Pound the garlic cloves, parsley and salt into a paste form. Combine the paste with softened butter and season with black pepper. Add in lemon juice and spread the butter mixture onto the prawns.
3. Preheat the oven at 230 deg C and bake prawn for 25mins* until the prawns are pink and opaque. Serve garnished with chopped parsley and lemon wedges on the side.
* I tried baking for 5-7 mins as stated in Delia's instruction but the prawns were not fully cooked, so I continued to bake for another 20mins till it was completely done.
Coffee and Walnut Sponge Mini Cupcakes
Another amazing recipe from Delia Smith. I liked this straight forward recipe using sponge cake method for coffee & walnut. I have made a few modification to this recipe : replacing the topping with cream cheese instead of mascarpone and made into mini cupcakes instead of a whole cake. The result was fantastic! The cream cheese blended well with the cakes, just that the coffee taste wasn't strong enough. I enjoyed creating the decorative toppings and my kids love them.
I am submitting this post to "Cook like a Star" with this month featured chef Delia Smith, organised by Bake for Happy Kids, Piece of Cake and Eat your heart out.
This recipe is also listed on Very Good Recipes and adding this to Bake-Along #44-Celebration Cupcakes for Bake-Along 2nd Anniversary.

Recipe adapted from Delia Smith :(with my modification in blue)
Ingredients
115g self-raising flour1 level teaspoon baking powder
115g butter (softened)
2 large eggs
100g golden caster sugar (I reduced from 115g)
1 tsp instant espresso coffee powder (can increase to 2tsp)
50g walnuts, chopped finely
Cream Cheese Frosting:
125g cream cheese (room temp)
50g butter (room temp)
50g icing sugar (sifted)
few drops of lemon juice
Directions
1. Sift the flour and baking powder into a roomy mixing bowl, holding the sieve quite high to give the flour a good airing as it goes down.
2. Add the butter, eggs, caster sugar, and coffee powder. Now, using a electric hand whisk, mix to a smooth, creamy consistency for about 1 minute.
3. Fold in the chopped nuts into the mixture and scoop into fillers. Bake at 170 deg C for 20-25mins or when toothpick comes out clean..
4. To make cream cheese frosting: Mix all the ingredients and beat till well blended (add coloring if desired). Pipe frosting on top of cool cake and add decorative.
Saturday, March 23, 2013
Little Croustades filled with chicken mushroom
When I saw this recipe from Delia Smith, I was so amazed with the base using bread and the simplicity of making it. So I give it a shot but I have modified it with chicken mushroom fillings instead. The taste was awesome, with the base crusty and the fillings tasted so well with it. Even my hubby complimented it as a yummy bites.
The next time, I would love to try using ready available canned Seafood spread or Salmon Mayonnaise for the fillings and I am sure it will be a quick snacks to prepare for the kids.
I am submitting this post to "Cook like a Star" with this month featured chef Delia Smith, organised by Bake for Happy Kids, Piece of Cake and Eat your heart out.
This recipe is also listed on Very Good Recipes.Recipe adapted from Delia Smith
(with my modification in blue)

Ingredients
For the croustades:6 slices bread (can made 24pcs)
50g butter
1 tsp chopped garlic
salt and freshly milled black pepper
For the fillings:
2 pcs chicken breast (diced)
2 pcs shitake mushroom (diced)
1/2 pcs carrot (diced)
1/2 onion (diced)
Seasoning
Parsley
Directions
1. Place the slices of bread on a flat surface and press them with a rolling pin to make them as thin as possible. Stamp out rounds using 5.5cm cutter (I used flower cutter).
2. Melt the butter containing the garlic and a seasoning of salt and freshly milled black pepper in microwave.
3. Coat the little bread rounds on both sides with melted butter and then press them into the tartlet tins firmly.
4. Bake them for about 20-25 mins or until crisp and brown. Cool them on a wire rack. (You can store them in a airtight tin for up to 2 weeks)
5. Heat pan with a little oil, fry onion till lightly brown and add carrots, mushroom and chicken. Add water and simmer for a while. Add corn starch to thicken the gravy.
6. Fill the croustades with chicken mushroom fillings and topped with parsley.
2. Melt the butter containing the garlic and a seasoning of salt and freshly milled black pepper in microwave.
3. Coat the little bread rounds on both sides with melted butter and then press them into the tartlet tins firmly.
4. Bake them for about 20-25 mins or until crisp and brown. Cool them on a wire rack. (You can store them in a airtight tin for up to 2 weeks)
5. Heat pan with a little oil, fry onion till lightly brown and add carrots, mushroom and chicken. Add water and simmer for a while. Add corn starch to thicken the gravy.
6. Fill the croustades with chicken mushroom fillings and topped with parsley.
Subscribe to:
Posts (Atom)


.jpg)

.jpg)