BeautyMe Love Recipes

BeautyMe Love Recipes
Showing posts with label Steamed / Kueh. Show all posts

Saturday, September 2, 2017

Steamed Egg Muffins (鸡蛋糕)

                                      2 September 2017                     13 September 2015


13 September 2015
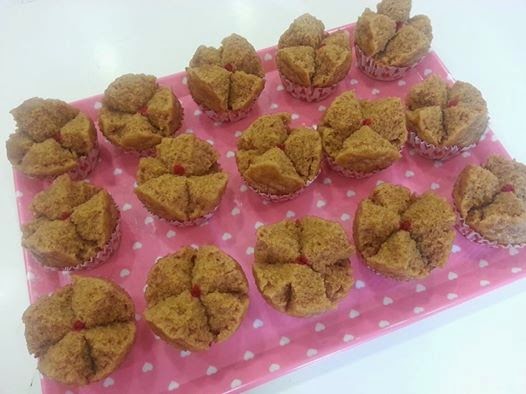
As I still have leftover soda water from making my Fish Fillet, I decided to use it to make my favourite Steamed Egg Muffins. I really love these red fillers which contrasted with the yellow colour of the muffins. 

2 September 2017 
Craving for 鸡蛋糕, so decided to make some and added pandan paste to have Pandan Steamed Egg Muffin. 

Monday, February 22, 2016

Steamed Pork Floss Cake

I am a lover of Pork Floss and to blend Pork Floss with cake was just amazing. I have been craving these Steamed Pork Floss Cake for quite some time, so I decided to make these for teatime. They looked so nice with the fillers I bought from Hong Kong. Great satisfaction!


Saturday, January 2, 2016

Sesame Balls aka Jian Dui (煎堆)


I tried making these Sesame Balls aka "Jian Dui" Thanks to Food Ink for the recipe with video. Jian Dui is a type of fried Chinese pastry, coated with sesame seeds on the outside and with fillings wrapped inside. This pastry is crisp and chewy, with a large hollow that expand after frying. You can use any filling of your preference, I used gula melaka grated coconut (which is not the usual filling) and surprisingly it tasted as delicious. The only thing to take note is the oil must not be too hot or it will turn brown faster while the dough will not be cooked. 

Ingredients

50g Rice flour
1tbsp sugar
30g water
White sesame seeds
Red bean paste/crushed peanuts/gula melaka  grated coconut

Directions

1. Add sugar and water, mix well into a dough.
2. Roll dough into balls. Flatten dough and add fillings int the centre of balls. Seal it tightly and roll into a smooth balls..
3. Coat with white sesame seeds and fry the balls till golden brown.

Friday, January 1, 2016

Pandan Ondeh Ondeh


Making my favourite traditional and Peranakan kueh, Ondeh Ondeh to start a New Year 2016. Thanks to Food For Life TV by FairPrice that comes with a easy steps video so that I can record in my blog for future reference. I love the melted gula melaka that are wrapped inside the balls, the fragrant and sweetness just makes this dessert irresistible. 

Recipe with modifications 

Ingredients

250g glutinous rice flour
150g gula melaka (crushed into small pieces)
200g of pandan juice
A pinch of salt
100g grated coconut
Few drop of green colouring (optional)

Directions

1. Mixed grated coconut with a pinch of salt and steam for 2-3 mins and let it cool completely.
2. Combine glutinous rice flour with pandan juice and knead lightly.
3. Take 15g of dough and flatten it and fill the center with some gula melaka. Roll them into a ball.
4. Cook the balls in boiling water and remove them once they float to the surface.
5. Coat the rice balls with grated coconut and serve immediately..

Saturday, December 5, 2015

Steamed Egg Muffins


I got so much craving for Steamed Egg Muffins and instead of the normal yellowish colour, I added some colourings to make it colourful. I used colour essence but if you prefer, you may used natural colouring from pandan leaves, carrot juice etc The amazing thing was, it has a nicer dome as compared to my usual ones. Not only it brighten up my day and also my craving too! 

Saturday, August 1, 2015

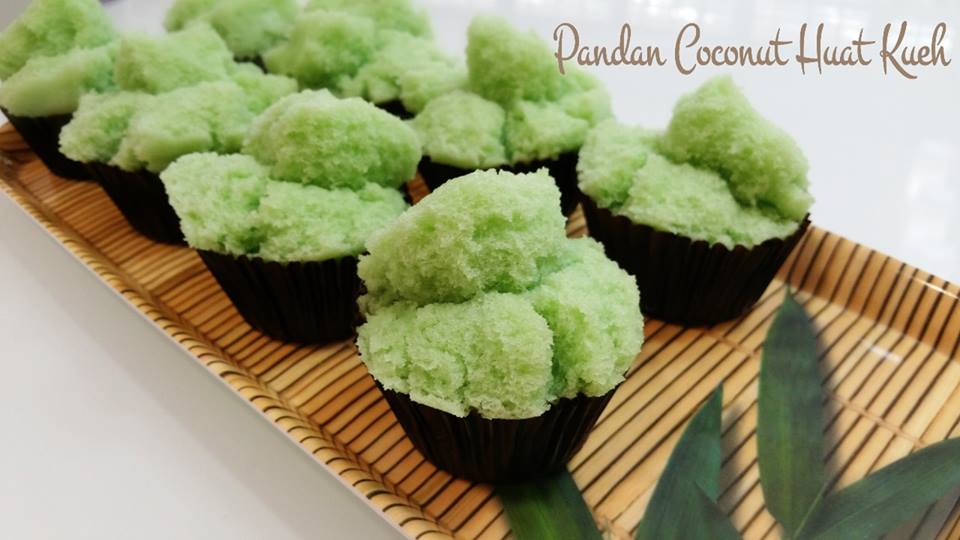
Pandan Coconut Huat Kueh


Thanks to Linda Ling for this recipe and my Pandan Coconut Huat Kueh really huat beautifully! Very fragrant with pandan and coconut flavour. So easy and quick to make too!

Some modifications made:

Ingredients 

250g self raising flour
1 tsp baking powder
2 tbsp corn oil
A pinch of salt
125g castor sugar
270ml coconut milk (original 250ml but I bought a can with 270ml)
1 tsp pandan paste (I did not use pandan leave to make the juice)

Directions

1. Mixed all ingredient together (sticky batter) and fill 3/4 of fillers.
2. Steam for 20-25 mins under high flame.

Saturday, July 18, 2015

Steamed Colour Cakes


I saw this recipe from Victoria Moon Kua and love the pretty color layers. Though the steps seem easy but I find the folding part was a challenge as my cake turned out not as spongy like Victoria. I could have over mixed and thus deflated the batter. Also, the batter was too much for the baking tin I used, I only managed to do 3 color layers. Overall it tasted yummy and I even have 2 pretty models for my bakes.

Ingredients 

(A)
1 tsp baking powder
250g cake flour
25g full cream milk powder
25g corn flour

(B)
100g fresh milk
50g butter (melted)

(C)
500g egg white
250g sugar
1/2 tsp salt

1 tsp strawberry paste
1 tsp coffee paste
1 tsp pandan paste

Directions

1. Grease and line 8 inch square pan with baking paper.
2. Sift A together and set aside.
3. Mix B together.
4. Whip C till stiff peak.
5. Fold A into C in a few addition.
6. Blend in B.
7. Divide batter into 4 equal portions and add in paste into individual portions (1 layer without any paste).
8. Steam each layer for 7 mins on high heat and at last layer, steam for 10 mins at medium heat.

Sunday, November 16, 2014

Steamed Pork Floss Cake


Thanks to Karen Ng from Baking Delights and Cake Making by Singaporeans for Singaporean for this yummy recipe. I love Pork Floss very much and this recipe combined cake and pork floss to perfection, what's more it's steamed so healthilicious! However, I did some modifications to the recipe. I increased the sugar from 60g to 80g and used Self Raising Flour. I did not have any spring form pan, so I used the normal pan with the baking paper cross and longer so I can lift the cake out of the pan.

Ingredients

5 Eggs
120g self raising flour
1/4 tsp baking powder
80g sugar
Pork Floss

Direction

1. Prepare steamer and grease baking mould and line with baking paper.
2. Whisk the egg until fluffy, add castor sugar and continue to beat until turns thick and pale.
3. Sift flour 3 times. Fold into the batter slowly and mix well.
4. Divide batter into 2 portions. Pour 1 portion of batter into the baking mould and spread neatly. Sprinkle pork floss on the batter and steam with high heat for 15 mins.
5. Pour 2nd portion of batter and spread neatly on the surface. Steam on high heat for 15 mins.
6. Remove from mould steamer and let it cool. 

Wednesday, October 8, 2014

Steamed Milo Cake

I came across this recipe from Cassandra Poh from Facebook Baking Community. I did not expect that these mould could make such beautiful steamed cake and since I had these mould, I gave it a shot. For the first batch, I purely added milo without the cocoa powder but I felt they were not sweet and there was not much of milo flavour. I added cocoa powder to the second batch and true enough, they were so much tastier. I would definitely make this often as it is quite easy to make it. 


Ingredients 

50g sugar
3 eggs
30g 3-in-1 milo
65g milk
70g melted butter
130g self raising flour
10g cocoa powder

Directions

1. Mix eggs and sugar until dissolved.
2. Add in milo milk and melted butter.
3. Add the self raising flour and cocoa powder.
4. Lastly, pour mixture into mould and steam for 15 mins.

Sunday, October 5, 2014

Chocolate Cake (Steamed)


I am glad that this steamed chocolate cake tasted as good as bake ones. There is no need to use electric mixer and the texture were soft and moist. I am happy that my kids love it and could not differentiate it from steam or bake :p

Ingredients 

200g Castor sugar
200g Full Cream evaporated milk
1 tsp Vanilla essence
180g Butter
2 eggs
100g Plain flour
50g Cocoa powder
1/2 tsp Baking powder
1/2 tsp Baking soda

Chocolate Fudge Topping
100g Condensed milk
1 tsp vanilla essence
30g butter (melted)
pinch of salt

Directions

1. Combine castor sugar, evaporated milk, vanilla essence and butter in a saucepan. Stir over low heat until sugar is dissolved and butter is melted, remove from heat and keep warm.
2. Add beaten eggs into the slightly cold evaporated milk mixture and stir till well mix.
3. Sieve flour, cocoa powder, baking powder and baking soda into a large mixing bowl, then pour the eggs mixture over the flour and stir till well mix (cake batter should be runny).
4. Heat up steamer and lined, grease baking pan.
5. Pour batter into lined pan and place the pan into the steamer and cover the top of pan loosely with a piece of aluminium.
6. Steam over medium heat for 45 mins.
7. Cool the cake in pan before turning out for further decoration.

For Chocolate Fudge Topping
1. Combine the sieved cocoa powder and condensed milk and melted butter.
2. Stir over low heat till thicken.
3. Cool the chocolate topping a little before spreading on the cake.

Saturday, August 23, 2014

Ang Ku Kueh (in Mooncake design)

As I had a packet of ground peanuts left in my cupboard, I decided to try making Ang Ku Kueh. Since Lantern Festival is round the corner, I had this crazy idea of making my Ang Ku Kueh using mooncake mould. It came out fantastic with the beautiful mooncake pattern and it tasted so nice with the sweet peanut fillings. My hubby and kids like these Mooncake Ang Ku Kueh as much as I do. 

* Sharing Notes:
1) I used mixer as I do not have blender.
2) I modified the dough to 20g & peanut filings to 15g which are nice amount for my moocake mould.
3) I added more water and oil to the dough as it was a little dry and I have some difficulty wrapping the peanut fillings in the dough. 
4) Do not steam for too long, steam 5mins and brush with oil and steam for another 5 mins. Extended steaming will cause the design to lose it visibility.

Recipe from Kenneth Goh with modifications

Ingredients

250g ground peanut
120g castor sugar
10g sesame seeds
15g cooking oil
2 tbsp plain flour
70g water

200g sweet potatoes (steamed and mashed)
20g caster sugar
50g cooking oil
200g glutinous rice flour
100g hot water (add a few drops of red colouring)

Cooking oil for brushing

Directions

1. In a large bowl, add grounded peanuts, castor sugar, sesame seeds, cooking oil, plain flour. Mix well. 
2. Add water gradually into 3 stages and use hand to mix until it form a firm dough.
3. Shape about 15g into balls and set aside.
4. Put mashed potatoes, sugar and cooking oil into mixer and mix well. 
5. Add in glutinuous rice flour and red hot water in 3 stages. Blend until well combined. Divide dough into 20g balls. 
6. Take a dough, flatten it and place in the centre with a peanut ball. Seal the edges, shape round and place onto mooncake mould. Press down firmly and dislodge it by knocking the mould on the table. Place on top of a piece of banana leaf.
7. Bring water in the steamer to boil. Once boiling, transfer the Ang Ku Kueh to the steamer. REDUCE THE HEAT TO LOW and steam for 5 mins.
8. After 5 minutes, open the cover, lightly wash the cake with some cooking oil (to prevent sticking) , and continue to steam the cake for another 5-7 minutes.

Saturday, August 16, 2014

Huat Kueh

Steamed these for praying my Father-In-Law
17 Aug 2014


I have been trying out a few Huat Kueh recipes that can laugh beautifully like these and finally I got it. Amazingly, these Huat Kueh not only tasted like those store bought but also easy to make (just add 300ml water or coconut milk).  Even my hubby gave a thumbs up for such a successful Huat Kueh!

Sunday, August 3, 2014

Kueh Lapis


Had always wanted to make this Kueh Lapis as my youngest daughter loves this very much. But due to the time consuming processes to steam each layer at a time, I was reluctant to do it until I found this simple step by step recipe from Kenneth Goh

After exploring this recipe, I managed to grasp some good tips when doing this Kueh Lapis.

1) I should add pandan leaves to the 500g water and boil it so the Kueh Lapis with have a fragrant pandan flavour.
2) I should ladle the equal amount of batter to each layer but I just estimated each layer of batter till I am not able to see the below layer.
3) I am not able to loosen out Kueh Lapis from my pan (after 2 hours) and so after going round the sides, I placed my hand beneath the base of the kueh to lift it up. Perhaps the correct way is to leave it in the chiller before attempting to take it out from the pan.
4) After releasing the Keuh lapis from the pan, I placed it on a tray and tried to cut with a greased knife but unfortunately it was so sticky and I am not able to get a nice smooth cut for every pieces. I would think the correct way is to place Keuh Lapis in the chiller for a few hours and it will be much easier to cut out nicely. 
  
Overall, it was a good try on this recipe :)

Ingredients  

(with my own modifications)

100g rice flour
350g tapioca flour
500g water (boil with Pandan leaves and leave to cool)
350g castor sugar
500ml of thick coconut milk (about 1 big packet)
Red food colouring

Directions

1. Put some water in the steamer and bring to boil.
2.Shift the tapioca and rice flours to a big bowl. Add in sugar. Stir well and make a well. Add in water and coconut milk. Use a balloon whisk to stir until well mixed and sugar are dissolved.
3. Lightly grease your preferred container and put the empty greased tin in the steamer. Let it steam for at least 5 minutes.
4. Open the lid of the steamer. Put 1-1.5 ladles of green/red flour solution in the tin. Steam for another 5 minutes. Repeat the procedure until all the green and red flour solution have finished. In the final layer, steam the whole cake for 15-20 minutes until the cake looks transparent. Rest for at least 1-2 hours before transferring for cutting.
5. Lightly grease a "sharp knife". Cut the cake in one knife. Do not saw the cake as the edge will not be smooth. 

Saturday, August 2, 2014

Sunkist Huat Kueh


I saw this recipe in Facebook Baking Group and was attracted to the vibrant yellow of these Huat Kueh. So with great curiosity, I decided to give it a try and indeed, it came out with such a nice color and they were smiling beautifully. The taste was not orangy but soft and fluffy. Personally, I still preferred Ji Dan Gao more with a strong eggy taste and slight chewy texture. Good experiment though!

Ingredients

230g Orange Juices (fresh or in Sunkist bottle)
100g sugar
50g corn oil
250g self raising flour
1 tsp baking powder

Directions

1. Mix orange juice & sugar till dissolved. Add oil mixed till combined.
2. Add in flour and mix well.
3. Spoon mixture to paper fillers up to 95%.
4. Steam for 15 mins at high heat.

Sunday, June 29, 2014

Kueh Dadar


Since I still have grated coconut and gula melaka left after making Onde Onde, I decided to make this Kueh Dadar that I used to make during school time. Somehow, I found it quite difficult to achieve a thin crepe even though I tried to swirl the batter as wide as I could. Nevertheless, my Kueh Dadar turned out quite successful with the fragrant gula melaka coconut. The batter was good enough to make only 8 pcs of crepes which were not enough for everyone. Perhaps, I will add more water to the batter to get a few more crepes (I still had excess of coconut fillings). 

Ingredients

200g coconut milk
180g plain water
1 egg
Few drops of pandan paste
150g plain flour
A pinch of salt
Cooking oil

2 pandan leaves (cut into small pieces)
75g water
150g gula melaka
250g grated coconut

Directions

1. In a mixing bowl, mix coconut milk, plain water and egg. Add pandan paste and whisk till well mixed. Sift in the plain flour, salt and whisk until well combined.
2. In a flat frying pan with medium heat, add some oil. Put a ladle of batter into the pan and swirl around the pan as thinly and quickly. Turn the crepe over the other side once it turn slightly brown. Set aside.
3. In a wok, put pandan leaves, water and gula melaka. Bring to boil and until all sugar dissolved. Add in the grated coconut and stir well. Let it simmer until coconut is moist and the water almost dry. Transfer to a bowl and let it cool.
4. Place a crepe on a flat surface. Put 2 tablespoons of coconut filings on the centre of the crepe. Fold the crepe into poh piah shape.