BeautyMe Love Recipes

BeautyMe Love Recipes

Saturday, June 21, 2014

Celine's 10th Birthday


I have baked a birthday cake for my youngest daughter with the flower marshmallows covering the sides. I am happy with this design and glad that my girl loves it. I have also baked some Orange Cranberry cupcakes and placed on my Hello Kitty stand and beautified the party spread.


Celine & her friends


Homemade Chocolate Chips Cookies and personalized rainbow loom for all guests :)

Sunday, June 15, 2014

Pandan Chiffon Cake

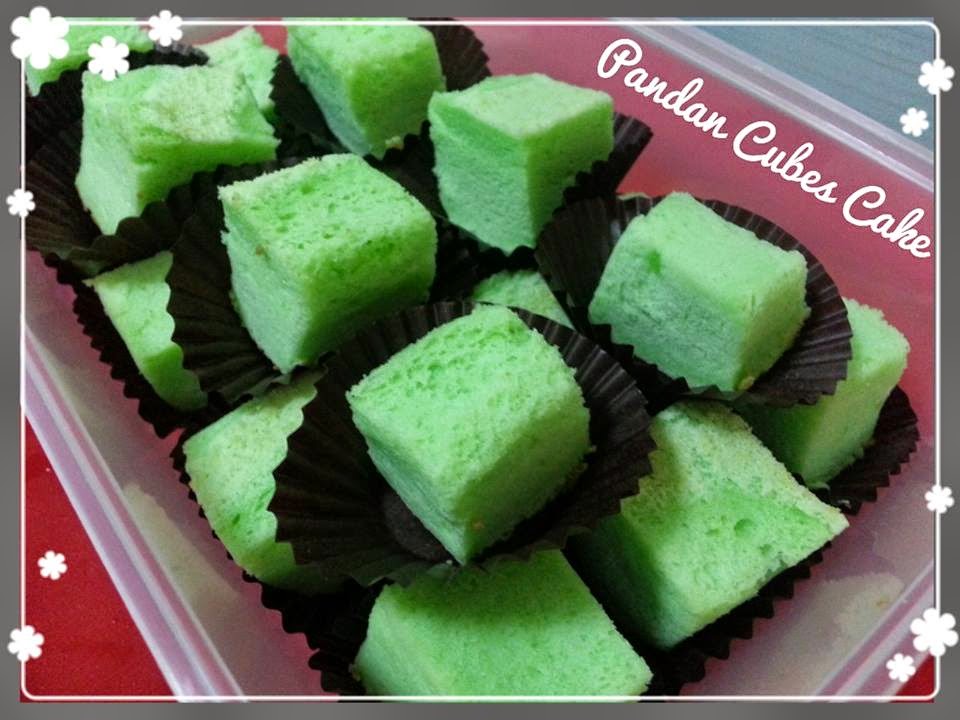
Finally, I picked up the courage to bake Pandan Chiffon Cake which has always been a difficult level of baking for me. I still remembered the time when I first baked this cake in my Secondary School Home Economics and my teacher told us that this cake required careful mixing in order not to deflate the cake, resulting in Kaya layer. Even since I have never wanted to try baking such cakes until recently when my neighbour gave me a few packets of coconut milk and my ex-colleague gave me a chiffon pan. However, the cake did not turn out well as expected and it shrinked drastically but texture was perfectly fine (you can see in the picture). I had no choice but to transform my Pandan Chiffon Cake to Pandan Cubes Cake. I am not going to satisfy with this result and will try it again with some advice from Chiffon Expert. Stay tuned for my successful Chiffon bake.

Brownies - Orders (2014)

I had a challenge to bake special heart-shaped brownies for my colleague. To make thing worse, I overbaked the brownies and made it more difficult to cut the brownies with the heart cutter. Covering the brownies with ganache was another challenge with the crumbly sides. I was not quite satisfied with the overall result but my colleague had no complain about it and even said it was very nice. Thanks to her for the encouragement and will continue to improve on my bakes.

Happy Father's Day


It was Father's Day and I baked this Chocolate Cake for my hubby. Glad that everyone liked the cake.

Taro Fragrance Rice

I have always wanted to cook this Taro fragrance rice as my Mother-In-Law loves Taro. So this Sunday, I decided to give it a try. This was not a difficult dish and the taste can be adjusted to your own preference. 

Ingredients

3 cups of white rice - washed
250g of yam- cut into cubes
1 carrot - cut into cubes
1 pack Chicken breast meat 
100g dried shrimps - soaked
100g dried mushroom-soaked & cut into thin strips
Few stalks of spring onions
Chopped garlic
Fried shallots
Olive oil
2 tbsp oyster sauce
2 tbsp dark soya sauce
2 tbsp light soya sauce
Dash of pepper

Directions

1. In a hot wok, put olive oil and add in chopped garlic. Saute until fragrant and add in dried mushroom, dried shrimps & stir for a while. Add in chicken breast meat, stir fry till well mix. Add in Taro and uncooked rice.Stir fry until well mix
2. Add in all the condiments (oyster sauce, light soya sauce, dark soya sauce, pepper). Adjust the color and taste to your preference.
3. Transfer the rice to rice cooker. Add in water to cover just level with rice and stir well (Note the water of rice have to be slightly less than usual as it had already absorb part of the liquid from the stir fried earlier, otherwise rice will be soggy).
4. Serve the rice hot in a bowl, garnish with chopped spring onion and fried shallots 

Sunday, June 8, 2014

Pandan Sponge Cups


Recently, I am so in love with pandan and so I done some research on pandan related recipes. This recipe attracted me with it's spongy texture and perfect with the pandan greenish colour. In addition, no oil and butter required and yet able to yield such a nice outlook and taste. Frankly speaking, I do not have much confident with folding egg whites method but I have succeeded for this recipe, a great motivation for me to move on to the next level of baking ie Chiffon Cake.

Source of recipe from Table for 2 
My recipe with slight modification 
(Yield 15 cups)

Ingredients

3 eggs
3 egg yolks
150g sugar
1 tsp pandan paste

3 egg whites
1 pinch of cream of tartar
1 tbsp sugar
75g cake flour (sifted)

Directions

1. Preheat oven to 190 deg C.
2. Beat eggs, egg yolks and sugar until creamy, pale and light. Add in pandan paste.
3. Fold in cake flour into egg yolk mixture and  poured into another bigger bowl.
4. Beat egg whites until foamy, then add in cream of tartar. Beat until soft peaks, then add in 1 tbsp of sugar and beat until stiff and glossy.
5. Fold in beaten egg whites in 3 addition into egg yolk mixture. Mix well gently and do not over mix.
6. Spoon batter into muffin cups until 1 cm to the rim. Bake for 20mins and check with a skewer.   

Kueh Pulut

I have tried this recipe many years ago (from a cookbook) and this is a perfect dessert to use up all my coconut milk. Quite an easy recipe but I have a few points that I would like to highlight. 

1) I steamed the glutinous rice in my rice cooker this round as different from previous where I put directly onto the square tray to steam (without pandan leaves). 
2) As I do not have blender to make pandan juice, I used pandan paste and it was perfectly nice for me.  
3) I used mixer for the top layer (felt faster that way and can mixed well).
4) There will be a layer of foam after mixing but not to worry as after steaming and cooling down, they will not be visible.
5) After cooled, I placed the cake in fridge before cutting as I preferred to eat it a little cold and also felt might help with neat cutting.
6) You can add more pandan paste or juice if you prefer darker green colour.

Hope the above helps you to make your Kueh Pulut! Enjoy :)

Ingredients

For the Rice Layer:
270g glutinous rice
240ml coconut milk (add 140ml water to 100ml thick coconut)
Few pandan leaves
Pinch of salt
Blue coloring (optional)

For the Top Layer:
2eggs
90g sugar
25g cornflour
1 tbsp plain flour
315ml thick coconut
1 tsp of pandan paste (you can use 1 tbsp pandan juice to your preference)

Directions

For Rice Layer: 
1. Soak rice in water for about 6 hrs or overnight.
2. Drain the water completely, mix in coconut milk and salt. Add in pandan leave and steam for 15 mins.
3. Grease a square tray or glassware (20 X 20). Pour the rice into the tray and compress the rice. Sprinkle a few drop of blue coloring (if preferred). 
4. Prepare steamer and steam rice for 10 mins.
For Top Layer:
5. Mix eggs and sugar for 5 mins. Then add cornflour, plain flour, coconut milk and pandan paste.
6. Strain the mixture to remove lumps.
7. Pour the mixture over the rice layer and steam for about 45 mins. Leave the cake to cool completely before cutting into pieces to serve. 

Seafood & Salmon Croissants Lunch

Today, as my maid had her day off, so I decided to make these Seafood & Salmon Croissants for lunch. Glad that the kids enjoyed this simple lunch as much as I do. 

Saturday, June 7, 2014

Chocolate Banana

Having my nephew staying over with my kids, I whipped up this Chocolate Banana for their dessert. Just from the smile on the faces, I knew that they love this dessert very much.

American Carrot Cake - Orders (2014)

A special order for Birthday!

Sunday, June 1, 2014

Ban Jian Kueh (面煎糕) aka Peanut Pancakes (1)

This is my hubby's favorite snack and I wanted to surprise him after a long day's work, so when I spotted the recipe from My Mind Patch, I decided to give this recipe a shot. Reading through the recipe seemed quite easy, just that it needed quite some time for proofing (100mins in total). I did the QQ Glutinous Pancake and replaced with my own creation of peanut filing. I felt challenging with swirling the batter all over the pan and not able to spread round the wall of the pan. For the 3rd pc of pancake, my batter was just enough on the centre of the pan and I felt it was much easier to fold half. Overall, it was a great experience for my 1st try. 

This snack is best to be consumed warm.

(Refer to My Mind Patch Recipe for pictorial directions)

Modified Recipe (only yield 3 pcs thin pancakes)

Ingredients

100g warm water (half hot water & half room temperature water)
30g sugar
1/2 tsp instant dry yeast

80g milk (room temperature)
1 egg (room temperature)
1/2 tsp vanilla essence 

Pinch of salt 
120g plain flour
10g glutinous rice flour

1/4 tsp baking soda
1 tsp water

50g ground peanut
20g fine sugar (adjust accordingly to your preference)
Butter (just enough to mix peanut & sugar)

Directions

1. Pour warm water into a container and add sugar (stir). Sprinkle yeast over the warm water and let the mixture stand for about 5 mins to activate the yeast. 
2. Add milk, egg and vanilla essence to the yeast mixture. Mix well.
3. Add in plain flour, glutinous flour and salt in 3 additions to the mixture in (2). Mix well into a smooth batter and cover with food wrap. Let the batter proof for about 90 mins till quantity double.
4. Mix the baking soda with 1 tsp of water, and add it to the batter in (3) after proofing. Mix well. Let the mixture stand for about 5 mins while you warm up the pan.
5. Heat up the Happycall double pan (or other non stick pan) in medium low heat and apply a coat of oil to it.
6. When the pan is hot, pour in the batter. Swirl the pan a few rounds to give an even spread round the pan.
7. Close and lock the pan to cook the pancake for about 12-15 mins. Lower the heat to lowest after 5 mins.
Shift the pan every 2-3 mins to ensure even heating. (The pancake is cooked when the edge pull away from the wall of the pan).
8. When the pancake is cooked, spread peanut mixture over half the pancake surface.
9. Fold the pancake into half with the help of wooden ladle.
10. Cut the pancake and serve warm.

Pandan Coconut Butter Cake


My neighbour gave me 6 pkts of Coconut Milk and when I came across this recipe, I was elated. I was attracted to the colour of the cake and the taste of coconut in the cake was just wonderful. I was a little worried that I might not be able get the perfect texture after reading the comments that some failed. After cutting the cake, I was overwhelmed with joy, I have made it!

Modified recipes

Ingredients

250g butter
200g sugar
6 eggs
300gm cake flour
1 tsp baking powder
200g cocnut milk
1/4 tsp salt
3 tbsp fresh milk
1 tsp pandan paste

Directions

1. Cream butter and sugar till creamy. 
2. Add in egg one at a time and make sure its properly mixed before adding in another egg. Pour in coconut milk, fresh milk and salt slowly and if it cuddles, put in some flour. Add in pandan paste.
3. Fold in sifted cake flour and baking powder and then pour into 7" square tray and bake at 175C for about 60 mins.

Friday, May 30, 2014

Orange Cake


My neighbour has 2 adorable kids and they love my bakes. My initial plan was to experiment on this cake on Sunday but when the 2 kids asked if there were cakes for them (on Friday night), my heart melted and so I decided to get up to bake this Orange Cake for them. I saw someone posted a Japanese Cotton Cheesecake with beautiful pattern on top, I was so eager to give it a try. I used Orange Cake instead of Japanese Cotton Cheesecake as I felt the pattern (I used melting chocolate) should not sink on heavy batter but part of it still sank. I have to further beautified it with melting chocolate after baked. 

After further discussion with my group of passion bakers, I have concluded that I should just add cocoa powder to some batter for the pattern and it should not sink. Will give it a try soon.

Sunday, May 25, 2014

Old Fashion Pull Apart Buns

I came across this bread from Guai Shu Shu's blog and it seemed quite easy with all the clear pictures and directions. The only thing in bread making is to wait for proofing time and kneading it correctly to get the right texture. However, my bread turned out soft straight from the oven but less soft and no tear off texture when cooled down, not sure if it was due to cornflour that I have missed out. I will give it another try again.  

Ingredients

420g plain flour
6g instant yeast
20g corn flour 
50g sugar
50g butter
1.5 tsp salt
265g lukewarm fresh milk
Additional 20g melted butter for brushing

Directions

1. Lightly greased a 9 inches round baking tin (I used Square baking tin)
2. In a mixing bowl, mixed all the ingredients (except butter) together. Use a spoon to slightly stir it until it form a sticky dough. Use the dough hook (I used my mixer as I do not have dough hook) to beat the dough till it leave the side of mixing bowl. (I used my hand to form a dough)
3. Transfer the dough out to a lightly flour surface. Lightly knead for 1-2 mins and let it proof until it double in size. Cover the dough with some clean wrap.
4. After the first proofing, transfer the dough out and divided equally into 18 portions (each portion about 50g). Shape the dough into a round ball and arrange in the baking tin. Cover the tin and let it proof until double in size (about 40 mins).
5. When the dough is almost ready, pre-heat the oven to 180 deg C. Once it is ready, bake in the oven for 20 - 25 mins or when the aroma of the bread starts to permeates the house and top turn golden brown. 
6. While the buns are hot, brush with melted butter sparingly. Transfer out to a cooling rack. Cooled completely before serving.

* Note: I sprinkled white sugar on top of the proof dough before baking. 

Tapas Lunch


I was scratching my head what to cook for every Sunday lunch and when I came across some pictures of Tapas with various toppings, I knew I had the right stuff for lunch this Sunday. I bought country loaves, whipped up some egg mayo, cut hams and mozzarella cheese. I also baked some mushrooms with olive oil and seasoned with Garlic & Spices (stored bought). Not forgetting to have hot creamy chicken soup to add perfection to our Sunday Lunch.

Blueberry Crumble Cupcakes

A great Sunday morning and I decided to wake up early to make these Blueberry Crumble Cupacakes which my kids have been craving for sometimes. It was a quick whip up recipe and in no time, my kids were smiling away with the crumbs all over their mouth. Glad to see that they love my bakes!

Sunday, May 18, 2014

Beary Cheesecakes


I was amazed to come across this recipe with such cute beary design and wanted to surprise my kids. It was indeed an easy yet fun recipe and delighted that it came out well. What a Beary Happy Day!


Ingredients

250g cream cheese(cubed and softened)
65g castor sugar
15 oreo cookies( separate 5 pieces and remove cream, 10 pieces original form)
1 egg
1/2 tsp vanilla essence

For decor
15 Ritz Bits biscuits (separate all and remove cheese)
30 pieces of chocolate chips

*Yield 10pcs of Beary Cheesecake

Directions

1. Line cupcake cases with 1 (original form) + 1/2 (cream removed) oreo cookies. Set aside.
2.  Beat cream cheese and sugar until combined. Add the egg and vanilla essence and continue to beat until just combined. *Note: Do not over-whisk after beating in the egg. It will incorporate lots of air into the mixture, causing the cake to crack easily during baking.
3. Scoop and distribute the mixture evenly into cup fillers and bake in preheated oven at 150C for 20 mins.
4. Leave baked cheesecake to cool at room temperature prior to refrigerating for at least 4 hours before consuming.

Saturday, May 17, 2014

Homemade Muah Chee

Got this recipe from my friend and decided to give it a try if it's the same as what we bought from Pasar Malam. Indeed, they are as yummy and easy to make. No need to hunt for Pasar Malam for our favourite snacks anymore, it can be homemade now! 


Ingredients

120g glutinous rice flour
180ml water
2 tbsp cooking oil
ground peanuts & sugar (mix)

Directions

1. Mix the glutinous rice flour, water and oil in a microwavable bowl and microware for 3.5mins. Keep stiring and the outcome is a sticky paste.
2. Stir the paste and mix well. Cut the sticky paste into small cubes and coat them well with the peanut mix.

Saturday, May 10, 2014

Soy Milk Marble Ogura Cake

I just love the color pattern in this cake and I am satisfied that I have done well on the folding method to yield a well risen cake. My hubby and kids love this cake as it is soft with a little pinch of soya milk taste.

Ingredients

80g soy milk (cut two pieces of pandan leaf into small pieces and microwave with soy milk)
4 egg yolks
1 whole egg
75g cake flour
45g canola oil
a pinch of salt

70g sugar
4 egg whites

Pandan Coloring

Directions

1.  Preheat oven to 190C. Grease and line a parchment paper at the bottom of a 7 inch square baking tin.
2. Sift cake flour, add salt and set aside. Mix oil, soy milk, egg yolks, whole eggs, sugar and whisk well. Add in flour into the mixture in 2 batches.
3.  Beat the egg whites until soft peak form. Gradually add in castor sugar, a tbsp at a time and continue to beeat until it is almost stiff peak form.
4.  Fold 1/3 of the beatened egg whites into the flour mixture first, then repeat 2 more times with the remaining egg whites. Take out 5 tbsp of the mixture and fold in the extracted thick pandan juice.
5.  Pour half of the plain batter into the prepared cake tin, then spoon in the pandan batter. Scatter onto the plain batter then pour in the remaining plain batter. Use a paring knife to make a few swirls. Tap the tin once on the bench top to get rid of any large air bubbles and place the cake tin inside the larger tin with hot water in the oven. Bake in water-bath at 190C for 15 mins and turn to 135C for 45 mins.
6. Remove cake tin from the oven. Carefully turn out onto a tray and let it cool completely before slicing.

Happy Mother's Day 2014

I was tasked to bake a Mother's Day cake for our Family dinner and I felt that Amercian Carrot Cake would be great for this occasion. On top of the regular 1 whole cake (which I felt will not be enough for a group of 20), I added these specially packed "Cake in a Cup" to complement it. Indeed, it turned out fantastic and everyone was astonished with the special creation. Thump ups for the yummy Carrot Cake and cream cheese combination. Felt great accomplishment with this task completed.
 
Wishing all mothers a Happy Mother's Day! 


Sunday, May 4, 2014

Souffle Japanese Cheesecake

I was attracted by this recipe with only 4 ingredients and so I gave it a shot. This recipe required egg separation and folding method, another training session for me too. 

The cake turned out nice without the top being deflated, the texture was indeed soft and smooth. I love this cheesecake and I will add more lemon juice the next time to have a more refreshing taste. 

Note : this cake is best eaten chilled.    

Ingredients

125g cream cheese, room temperature
120g white chocolate
3 cold eggs, 70g each
1.5 tbsp lemon juice & zest

Directions

1. Line baking tin with parchment paper at the bottom and grease the sides with butter, set aside. 
2. Separate the eggs. Place egg whites in the fridge which makes the meringue more stable.
3. Preheat oven 170 deg C.
4. Break white chocolate into pieces in a large bowl and melt in a double boiler over hot water. Mix chocolate to smooth. Then add cream cheese into it and stir till smooth with a hand whisk.
5. Remove the bowl from double boiler. Add egg yolks, mix well followed by lemon juice and zest, mix well again with a hand whisk. set aside.
6. Whisk egg whites with an electric mixer until firm peak form. If it's thick enough, you can turn the bowl upside down without it sliding out.
7. Add 1/3 meringue into the cream cheese batter and blend well with a rubber spatula. Then add the rest of the meringue and mix well.
8. Pour into baking pan and drop the pan lightly on the counter top to release the air bubbles out of the batter.
9. Steam bake the cake for 15 mins then lower the temperature of 160 deg C for 15 mins. Turn off the oven temperature and leave the cake inside the over for another 15 mins.
10. Leave the cake to cool completely before removing from the baking pan.
11. Chill the cake before consuming (about 2-3 hours) and dust with powdered sugar (optional).

Cavan 12th Birthday Cake


I  felt so accomplished baking this birthday cake for my son, Cavan's 12th birthday. Managed to put in all his favourite stuff on this cake and seeing him so surprised and happy, it was definitely a great achievement to me.

Sunday, April 20, 2014

Pork Floss Cake

I always wanted to bake this Pork Floss Cake for a long time and I finally baked this cake today. I love pork floss alot and when my friend gave me a piece of her Pork Floss Cake, I found it so unique and yummy. 

I got this recipe which is a chocolate chiffon cake but I replaced the cocoa powder with cake flour and added Pork Floss. As I have added a large handful of pork floss, the cake did not rise as much. So I suggest to add just 50g of Pork Floss into the batter. You can add more on top of the cake after spreading a layer of mayonnaise, that should do the trick for Pork Floss lovers like me.

There is another tip that I would like to share. As I did not have any chiffon pan, so I used a normal baking pan. To note when using a normal pan, you do not need to cool the cake upside down. Once the cake leaves the side of the baking pan, use a knife to go round the side and remove pan. Cool cake completely before cutting.

Ingredients

(A)
80g cake flour
5 egg yolks
20g castor sugar
70g water
60g canola oil

(B)
5 egg whites
90g castor sugar
10g corn flour

(C) 50g Pork floss

Directions

1. Preheat oven 160 Deg C. Combine egg yolks and sugar and mix well. Add water and oil and mix till incorporated. Add in flour and blend well.
2. Combine sugar and corn flour. Beat egg whites till foamy. Gradually add half the sugar and cornflour and continue beating for a few minutes. Add the remaining sugar and corn flour and beat till stiff peak form.
3. Spoon out 1/3 of the meringue and gradually fold into the egg mixture, taking care not to deflate the egg whites too much. When it's well-blended, pour the mixture into the remaining meringue and fold in gently, making sure that all the egg whites are incorporated into the mixture. Add in Pork Floss and gently mix it.
4. Pour the batter into ungreased cake pan. Bake for 45-50 minutes before removing from the oven and turning it upside down to cool and serve.

Friday, April 18, 2014

Cottony Cake

When I came across this recipe, I was thinking that it looked quite simple and I can have another chance to practice my folding method again. Since I have all the ingredients readily, I gave it a shot. Though the cake did not rise as much as I expected it to be but overall the texture was soft with a nice color on top. The texture resembled those sold in Prima Deli with cheese, kaya and chocolate filings. I will try making it in cupcakes and with filling the next time.

Ingredients

(A)
3 egg yolks
1 whole egg
50g corn oil

(B)
50g Cake flour

(C)
3 egg whites

(D)
50g Caster sugar
Dash of salt

Directions

1. Beat (A) till well mixed with an egg beater.
2. Sift in (B), mix well.
3. Whisk (C) till frothy, add (D) and beat till stiff peaks.
4.Fold in the egg white mixture to egg yolk mixture in 3 additions, mix till well combined. Pour batter into baking pan.
5.Bake in preheated oven at 150 Deg C for about 40 mins.

Sunday, April 13, 2014

Fun with Fondant

Today, I felt like playing with fondant so I did some simple heart designs to start with. I felt it was not that easy to handle fondant especially in my hot and humid kitchen. I needed to quickly rush out the design and then place them in  an air conditioner room. Guess that was the tricky part of designing cake with fondant. However, I felt it was a good experiment!

Old School Butter Cake

I have a strong craving for butter cake and with my last block of Lurpak, I decided to try this Old School Butter Cake recipe. Also, it was another chance for me to practice my folding method. 

Overall, it tasted nice but I felt that Lurpak was still not as buttery as SCS, so I will stick to SCS for my butter cake. However, this recipe was indeed less oily and since it used folding method, the cake had a much softer texture.


Ingredients

250g butter
85g Caster sugar
1 tsp Vanilla essence
1/8 tsp salt
4 egg yolks
1 tbsp Milk
200g plain flour
1 tsp Baking powder

4 egg whites
85g Caster sugar

Directions

1. Preheat oven at 170 Deg C. Line a 8" Square tin
2. Cream butter, sugar, salt and vanilla until light and fluffy.
3. Add in egg yolk one at a time and beat till creamy. Add in milk and mix well.
4. Sift in flour and baking powder and mix well. Set aside.
5. Whisk egg white and sugar till soft peak in another bowl.
6. Fold 1/4 of egg white mixture into butter mixture (3). Mix well and fold in the rest.
7. Pour batter into lined baking pan and bake for 40-45 mins or until cooked.

Sunday, April 6, 2014

鸡蛋糕 (Ji Dan Gao), 番薯糕 (Fan Shu Gao), 南瓜糕 (Nan Gua Gao)

My Mother-in-Law said to go praying our ancestors on 6 April 14, so I decided to steam these 3 different types of "Gaos" - 鸡蛋糕 (Ji Dan Gao), 番薯糕 (Fan Shu Gao), 南瓜糕 (Nan Gua Gao). 

Saturday, March 8, 2014

Longan Tofu

The weather has been very hot and humid lately, making it worse with the haze coming from Indonesia, so I decided to make this cooling desserts, Longan Tofu. The steps were very easy to follow and the texture super soft and smooth. I am glad that everyone loves this desserts alot!


Ingredients

1 level tbsp Agar Agar powder (8g)
1L water
210g sugar
2 blades pandan leaf, tied into a knot
1L soya milk (I used sweetened)
150ml evaporated milk
150ml canned longan syrup (from longan can)
Longan

Directions

1.Cook sugar, 750ml water and pandan leaf until water boils.
2.Mix agar agar powder with 250ml water and pour into boiled mixture (step 1). Bring to boil again , simmer for another 2-3 mins and turn off heat.
3.Pour in soy milk, evaporated milk and longan syrup. Mix well.
4. Pour soya mixture into prepared cups.
5. Let them cool down a little and let cool down a little and add 1 longan on top. Chill in fridge before serving. 

Sunday, February 16, 2014

Valentines Brownies - Orders (2014)


My colleague asked me to bake Brownies to surprise her Fiance for Valentine's Day. So I decided to bake this Chewy Brownies and with a little touch of decorations, the cake turned out excellent. I am glad they love the Brownies as much as I do.

I submitted this Brownies to SCS Dairy Singapore to compete for the top 10 most Likes. Hope this Brownies could win the challenge.

Sunday, February 9, 2014

Butter Cookies

Recently, my friend recommended me to try Lurpak Butter to make Danish Butter Cookies. The butter came with recipes for various kind of cookies and so I decided to give it a try. This is my first time making cookies dough into oblong rolls, just needed to cut into slices and bake it. Kind of interesting but I found the dough a little difficult to roll nicely. The final products did smell buttery but I felt it did not have the buttery taste as I wanted. Will try another Danish Butter Cookies recipe from my friend and see if it will taste more buttery.

Ingredients

250g Lurpak Butter
125g icing sugar
1 egg
350g plain flour

Directions

1. Cut butter into small pieces and mix with other ingredients with a mixer. Mix till just combined.
2. Roll the dough into an oblong sausage, wrap the dough sausage in baking paper and refrigerate for 2 hours.
3. Cut the dough into thin slices, placing the slices on a baking sheet.
4. Bake the cookies in preheated oven at 200 deg C for 6-8 mins until golden.
5. Cool the cookies on a cooling rack and them store in airtight container.

Banana Walnut Cupcakes


Baked these Banana Walnut Cupcakes for my MIL's Exercise Group of Friends for their breakfast tomorrow. Hope they will like them :)

Grilled Fish with Salad & Olive Oregano Rice

Since Valentine is round the corner, just have this feeling to cook something special with love for lunch. I gave it a try using Olive oil and Oregano flakes to cook the rice and the combination were excellent. The rice was so fragrant and tasted so yummy with the Grilled Fish and salad. Felt so satisfying to see everyone eating it with great smiles on their faces.

Sunday, January 26, 2014

Pineapple Tarts (2014)


The most happiest time is to bake my favorite pineapple tarts. Past years, I had always baked the open flowers pineapple tarts but I decided to give a try the close up ones this year. Thanks to my friend, Rachel for giving me this recipe which is in between flaky & melting type and it's really super duper yummy! Will definitely make more next year.

Recipe with slight modifications

Ingredients

(You will need 2 lot of dough to make 1kg of pineapple filling)

Dough - 1 lot
230g Butter (SCS Salted Butter)-thaw for 15mins  before beating
35g Castor sugar
1tsp Icing sugar
2 egg yolks (33-35g)
1tsp Vanilla
340g Top flour
25g Full Cream Milk (Nespray Everyday Full Cream milk powder)

1kg pineapple filling (I used Phoon Huat Premium Pineapple filling)

160ml Organic Pineapple Jiuce (no sugar added) NTUC

1 no beaten egg for egg wash ( r
emove 1tbsp of white & add 2 drops of oil)

Directions

1. Preheat oven  170-180 C. Line up the baking tray.
2. Beat butter, sugar, icing sugar & vanilla for 2-3mins.
3. Add in the egg yolks till well mixed.
4. Add in sifted flour & milk powder by using a spatula. (do not overmix)
5. Divide the pineapple filling into 5g balls.
6. Split the dough into 6g and wrap up the filling (bite size)
7. Egg wash and bake on the lined tray at 170-180 C for 20mins.