Making my favourite Hello Kitty cookies had always in one of my To-Do list item and finally I made it!. I used one of my butter cookies recipe and added coloring for the red ribbons and yellow nose while I used melted converture chocolate to color the eyes and whiskers. I am so delighted to see the finished cookies.
BeautyMe Love Recipes
Saturday, October 10, 2015
French Toast
After making Fried Sardine Bread Puff, I was left with all the bread skins. So I decided to cut them up into cubes and added beaten eggs with sugar to make them into French Toast. I baked them till golden brown and topped with blueberry fillings or syrup. Great for breakfast as it is fast and easy to make, most importantly no waste at all.
Fried Bread Sardine Puff
I bought the curry puff mould and tried making curry puff but failed as the pastry always tore off easily. I came across this method using bread to make curry puff, however I did not have the ingredients so I used sardine instead. The moulding was so easy and surprisingly it tasted so crispy and yummy! Will definitely try to use it to make curry puff one day.
![]() |
| Step 1 |
Ingredients
1 can sardineChilli Sauce
Tomato Sauce
1 onion (chopped)
15 slices of bread (cut off the sides)
![]() |
| Step 2 |
Directions
1. Cooked sardine with onion, chilli sauce and tomato sauce.
2. Press bread with rolling pin and place bread on mould. Scoop some sardine onto bread (Step 1) and press bread (Step 2). Cut off excess bread that protrude the mould.
3. Heat up a pot of oil and fry till golden brown. Drain off excess oil.
2. Press bread with rolling pin and place bread on mould. Scoop some sardine onto bread (Step 1) and press bread (Step 2). Cut off excess bread that protrude the mould.
3. Heat up a pot of oil and fry till golden brown. Drain off excess oil.
Wednesday, October 7, 2015
Old Times Slice Cakes
After making the Rosy Birthday cake for my elder daughter, I was left with half packet of whipping cream. Since I needed to clear it soon, I decided to make these Old Times Slice Cakes that I love to eat during my childhood days. Making these cakes needed a bit of time and patience - I baked 2 square sponge cakes and sandwiched with whipping cream. It was also a little tricky to slice it as the cream will squeeze out so the best is to put the cake into the fridge before slicing. I just love the beautiful and taste of these Old Times Slice Cakes so much!
Note : recipe below for 1 layer of sponge cake.
Ingredients
2 eggs (room temperature)1 egg yolk (room temperature)
55g sugar
a little salt40g milk
60g self raising flour
Red Colourings
Whipping cream
Pipping Jelly
Colourings (Red, Yellow, Green)Note :
For Chocolate sponge - 50g Self Raising Flour & 10g cocoa Powder
Directions
1. Preheat oven at 170 deg C.
2. Whisk eggs and egg yolk, sugar and salt till pale and ribbon stage.
3. Add milk, follow by flour and cocoa powder until just combined. Do not over beat.
4.Pour batter into square baking tin and bake for 20mins or till skewer comes out clean..
5. Spread whipping cream and keep in fridge for 1 hour before cutting into slices.
6. Add colour to piping jelly and mix. Decorate as preferred.
2. Whisk eggs and egg yolk, sugar and salt till pale and ribbon stage.
3. Add milk, follow by flour and cocoa powder until just combined. Do not over beat.
4.Pour batter into square baking tin and bake for 20mins or till skewer comes out clean..
5. Spread whipping cream and keep in fridge for 1 hour before cutting into slices.
6. Add colour to piping jelly and mix. Decorate as preferred.
Cake - We ❤ Recipes
With the excess whipping cream left over from making a birthday cake for my daughter and Old Times Slice Cakes, I also made a special cake to commemorate my Facebook Group "We ❤ Recipes" thanking all members for their support and active participation. A simple yet meaningful cake!
Sunday, October 4, 2015
Butter Cake
I have tried a few butter cake recipes but this the best I have ever baked. Thanks to The Domestic Goddess Wannabe. I like the crispiness of the sides and the buttery aroma as well as the moist texture from the cake. Perhaps, this recipe has milk added that made the cake moist after baking. A great recipe to keep.
Ingredients
250g butter (room temperature)
150g sugar
4 eggs
1 tbsop vanilla essence
1 tsp baking powder
1/2 tsp baking soda
240g fresh milk
150g sugar
4 eggs
1 tbsop vanilla essence
1 tsp baking powder
1/2 tsp baking soda
240g fresh milk
Directions
1. In a mixing bowl, cream butter and sugar until light and fluffy.
2. Add egg one at a time, beat to combine.
3. Add sifted flour, milk and vanilla essence in sequence flour-milk-flour-milk-flour, mixing just to combine. Do not over beat.
4. Pour batter into greased baking pan. Smooth top and bake at 170 Deg C for 50-60mins or until stick comes out clean.
2. Add egg one at a time, beat to combine.
3. Add sifted flour, milk and vanilla essence in sequence flour-milk-flour-milk-flour, mixing just to combine. Do not over beat.
4. Pour batter into greased baking pan. Smooth top and bake at 170 Deg C for 50-60mins or until stick comes out clean.
Friday, October 2, 2015
Birthday Cake (2015)
Made this cake for my eldest daughter's 19th Birthday. Took a long time to get this done but great satisfaction after completion. I am so happy that I attempted to pipe the roses, however not too perfect but glad that my daughter like it and also I received all the compliments for such a pretty cake!
Thursday, October 1, 2015
Gift for A Special Couple
Baked these Chocolate Muffins for a special Couple - Marcus & Foong Ee. They have always been supportive in all my bakes and so blessed to have them as my dearest friends.
Friday, September 25, 2015
Pear Drink (鸭梨水)
I remembered this drink we had during the last haze period. It was said to be a cooling drink for the body and expelled heatiness. So it was time that I made this drink for my family members with the recent haze. Glad that everyone love this drink!
Ingredients
6 Pears (cut each pear into quarters)
1 pkt Rock Sugar
Water
1 pkt Rock Sugar
Water
Directions
1. In a pot add water and pear (I used a big pot and add more than 1/2 pot of water).Cooked till boiled.
2. Add rock sugar and continue to boil another 30 mins. Can serve hot or chilled.
Orange Cake
Trying out to make a whole cake (exclude cranberry and double the ingredients quantity) with my Orange Cranberry Cupcakes Recipe. Not quite satisfied with the texture though as it did not rise as I expected from the cupcakes. The texture was tight and not spongy enough, perhaps due to the use of my new mixer (Kenwood) to whisk the eggs and sugar. It took a long time to whisk till pale and fluffy stage. I guess I will try again with my long time Philip Mixer if it yield the same result.
Thursday, September 24, 2015
Coconut Buns
It was a hazy day (PSI 262) and since we plan not to go out, I decided to bake this Coconut Buns. I had cross referenced with a few recipes on the coconut filings but the quantity was too much for 1 lot of dough. So I decided to come up with this adjusted quantity which I feel should be perfectly fit the amount of dough. I love the filings with a little moist and the gula melaka flavour that blends so well with the bun.
Ingredients
Coconut Filings
130g gula melaka
130g water
2 pandan leaves
250g grated coconut
Dough
320g bread flour
30g sugar
5g instant yeast
210g milk
40g salted butter
Milk (I used Soya Milk for brushing)
130g gula melaka
130g water
2 pandan leaves
250g grated coconutDough
320g bread flour
30g sugar
5g instant yeast
210g milk
40g salted butter
Milk (I used Soya Milk for brushing)
Directions
1. In a frying pan, add water, pandan leaves and gula melaka. Cook till the sugar completely dissolved. Reduce heat and stir in grated coconut. Cook until gula melaka has evenly coated the grated coconut. Set aside to cool down.
2. Mix bread flour, sugar and yeast in the mixing bowl, mix well.
3. Add in the milk and mix into a dough.
4. Add in butter and continue kneading for another 10 mins.
5. Allow the dough to rest about 1 hour or till double in size.
6. Divide the dough into 35g and roll into round shape. Spoon coconut filing in the centre, seal the edge and place them on a lined baking tray. Allow the dough to proof for about 40 mins.
7. Brush the dough with soya milk (or fresh milk).
8. Baked in a preheated oven 180 Deg C for about 15 mins or until the top brown.
2. Mix bread flour, sugar and yeast in the mixing bowl, mix well.
3. Add in the milk and mix into a dough.
4. Add in butter and continue kneading for another 10 mins.
5. Allow the dough to rest about 1 hour or till double in size.
6. Divide the dough into 35g and roll into round shape. Spoon coconut filing in the centre, seal the edge and place them on a lined baking tray. Allow the dough to proof for about 40 mins.
7. Brush the dough with soya milk (or fresh milk).
8. Baked in a preheated oven 180 Deg C for about 15 mins or until the top brown.
Saturday, September 19, 2015
Soya Milk/Pandan Soya Agar Agar (2015)
This year, I have decided to make the non Traditional & Cooling Mooncakes ie Soya Milk Agar Agar and Pandan Soya Agar Agar Mooncakes. My first attempt making the Pandan Soya Agar Agar Mooncakes failed as I did not cook the mixture long enough (till thicken). I have updated the recipe for future reference.
Thursday, September 17, 2015
Moist Banana Cupcakes
I was craving for banana cake and since I needed to clear a packet of walnuts which was going to expire, I decided to whip up this easy and yummy banana cupcakes with my Moist Banana Cake recipe. Feeling satisfied!
Tuesday, September 15, 2015
Colourful Agar Agar
I was in the mood to make something colourful and cooling, so I bought different colour of Agar Agar powders from Supermarket and get my hands to make these. This was quite time consuming as it needed time for them to set before adding the next layers but after completion, it was indeed pretty. They kids love them as it was not only nice to see but cooling too.
Ingredients
Coconut Layer
10g Agar Agar powder
800ml water
200g sugar
200g coconut milk
2 pandan leaves
Colour layers
1 pkt Green Agar Agar Powder
1 pkt Red Agar Agar Powder
1 pkt Yellow Agar Powder
1 pkt Orange Powder
Colorings (optional)
10g Agar Agar powder
800ml water
200g sugar
200g coconut milk
2 pandan leaves
Colour layers1 pkt Green Agar Agar Powder
1 pkt Red Agar Agar Powder
1 pkt Yellow Agar Powder
1 pkt Orange Powder
Colorings (optional)
Directions
1. Coconut layer - In a pot, add water, pandan leaves and agar agar powder and heat t boils. Turn off heat and add coconut milk. Remove pandan leaves and set aside to cool slightly.
2. Coloured layers - I start with green colour and follow by other colours (to your reference). Dissolve 1 pkt of Agar Agar powder in 1 litre of water. Add 250g sugar, stir and bring to boil on low heat.
3. Assemble - Scoop a few spoonful of Green Agar Agar and let it set in fridge for a while. Scoop a few spoonful of coconut agar agar (just enough to see the white layer) and let it set in fridge.
4. Cook the next colour as per Direction #2. Follow by filling in the coconut layers after each colour till all complete.
2. Coloured layers - I start with green colour and follow by other colours (to your reference). Dissolve 1 pkt of Agar Agar powder in 1 litre of water. Add 250g sugar, stir and bring to boil on low heat.
3. Assemble - Scoop a few spoonful of Green Agar Agar and let it set in fridge for a while. Scoop a few spoonful of coconut agar agar (just enough to see the white layer) and let it set in fridge.
4. Cook the next colour as per Direction #2. Follow by filling in the coconut layers after each colour till all complete.
Sunday, September 13, 2015
Condensed Milk Bread
Came across this great recipe from MiMi Bakery House and immediately got my hands on baking it. My dough did not rise alot but I am satisfied with my final bakes. The texture was soft and the sweetness from the condensed milk made the bread really yummy. Will definitely bake this again.
Recipe with modifications
Ingredients
200g bread flour
20g sugar
3g salt
3g instant yeast
25g condensed milk
130g milk
20g unsalted butter
Fillings
20g condensed milk
20g unsalted butter
Topping
Sliced almond
Icing sugar for dusting
20g sugar
3g salt
3g instant yeast
25g condensed milk
130g milk
20g unsalted butter
Fillings
20g condensed milk
20g unsalted butter
Topping
Sliced almond
Icing sugar for dusting
Directions
1. Put all the bread ingredients into your mixer bowl, knead on Medium speed for about 7-10 minutes, pliable dough. Cover with damp towel and proof for 30 mins until the dough doubles up in size
2. Meantime, place the ingredients for condensed milk fillings into another bowl and allow the butter to soften. Mix the condensed milk +soften butter to get a smooth paste.
3.Once proofing is ready, roll the dough into a rectangular shape. Spread the condensed milk filling onto it, and cut the dough into 4 equal strips. Stack the dough strips onto one another and cut them into 8 equal parts.
4. Place them into an 8-inch chiffon pan and allow them to proof for the 2nd time, about 30-40 minutes.
5. Sprinkle some almond flakes on the ready dough and bake them in a preheated oven of 150 Deg C for about 20-25 minutes. Remove the bread from the bread pan and dust them generously with icing sugar.
2. Meantime, place the ingredients for condensed milk fillings into another bowl and allow the butter to soften. Mix the condensed milk +soften butter to get a smooth paste.
3.Once proofing is ready, roll the dough into a rectangular shape. Spread the condensed milk filling onto it, and cut the dough into 4 equal strips. Stack the dough strips onto one another and cut them into 8 equal parts.
4. Place them into an 8-inch chiffon pan and allow them to proof for the 2nd time, about 30-40 minutes.
5. Sprinkle some almond flakes on the ready dough and bake them in a preheated oven of 150 Deg C for about 20-25 minutes. Remove the bread from the bread pan and dust them generously with icing sugar.
Apple Bread Pudding
I have never liked bread pudding because of the wet sponge texture but when I saw this recipe from MiMi Bakery House, I decided to give it a try. Simple steps and I have added chocolate chips and almond flakes. Overall, the texture wasn't as bad as I thought but I felt if it was sweeter it would be perfect! Now, I can make this if I have bread that are going to expire.
Ingredients
4 pieces slice bread (diced)
1 apple (diced)
5g butter
1 tbsp sugar
Raisins
Chocolate chips
Almond flakes
Icing sugar
3 eggs (small)
200g milk
40g yoghurt (I did not use whipping cream)
20g sugar
1 apple (diced)
5g butter
1 tbsp sugar
Raisins
Chocolate chips
Almond flakes
Icing sugar
3 eggs (small)
200g milk
40g yoghurt (I did not use whipping cream)
20g sugar
Directions
1. Cook diced apple with butter under low heat. Add sugar and cook for awhile.
2. Beat eggs, milk and yogurt until well combined. Add in sugar and mix until sugar dissolved.
3. Put apples, bread, raisins, chocolate chips into baking tray or ramekins.
4. Pour egg mixture over and spread almond flakes on top.
5. Baked 190 Deg C for 30-40mins.
2. Beat eggs, milk and yogurt until well combined. Add in sugar and mix until sugar dissolved.
3. Put apples, bread, raisins, chocolate chips into baking tray or ramekins.
4. Pour egg mixture over and spread almond flakes on top.
5. Baked 190 Deg C for 30-40mins.
Friday, September 11, 2015
Bread
Thanks to MiMi Bakery House for this great bread recipe. I have used this recipe to make into Mini Kaya Cheese Buns (topped with Kaya and cheese) and Plaits Bread. The Cheese Bread Sticks were crusty when they were out from the oven while the Kaya Cheese Buns has soft and airy texture inside. The only thing with bread making is the waiting time for proofing. Great satisfaction to see the final product
Recipe with slight modificationIngredients
320g bread flour
4g salt (I omitted)
30g sugar
4g instant yeast
210g milk

40g unsalted butter (I used salted butter)
Grated mozzarella cheese
Sugar
Kaya
Milk (for brushing)
4g salt (I omitted)
30g sugar
4g instant yeast
210g milk

40g unsalted butter (I used salted butter)
Grated mozzarella cheese
Sugar
Kaya
Milk (for brushing)
Directions
1. Mix bread flour, sugar and yeast in the mixing bowl, mix well.
2.Add in the milk and mix it into a dough.
3.Add in the butter and continue kneading for another 5-7 minutes.
4.Expel the air the dough and shape the dough into a round ball and allow the dough to rest for about 10 minutes.
5.Roll out the dough into rectangular shape. Cut the dough in stripes and place them on a lined baking tray.Allow the dough to proof for about 40 minutes.
6.Brush the dough with some milk, sprinkle both cheese and sugar over the dough.
7.Bake in a preheated oven of 175 degree Celcius for about 10-12 minutes.
3.Add in the butter and continue kneading for another 5-7 minutes.
4.Expel the air the dough and shape the dough into a round ball and allow the dough to rest for about 10 minutes.
5.Roll out the dough into rectangular shape. Cut the dough in stripes and place them on a lined baking tray.Allow the dough to proof for about 40 minutes.
6.Brush the dough with some milk, sprinkle both cheese and sugar over the dough.
7.Bake in a preheated oven of 175 degree Celcius for about 10-12 minutes.
Thursday, September 10, 2015
Curry Puffs
I had a craving for Curry Puff and found this simple dough recipe from Coco's Sweet Tooth. I cooked the curry fillings in my own preference (you can do the filling your way too). The curry puffs tasted fantastic. I just love the crispiness on the outside and tasty curry filings inside.
Recipe with modifications
Ingredients
Pastry
250g Plain Flour
2 1/2 tbsp corn oil
120g water
1/2 tsp salt
Curry Potatoes Fillings (you can refer to this instructions)
4 potatoes
200g breast meat (diced)
2 tbsp curry powder
1 tbsp salt (adjust according to your taste)
2 eggs (hard boiled and cut into 8 parts each)
250g Plain Flour
2 1/2 tbsp corn oil
120g water
1/2 tsp salt
Curry Potatoes Fillings (you can refer to this instructions)
4 potatoes
200g breast meat (diced)
2 tbsp curry powder
1 tbsp salt (adjust according to your taste)
2 eggs (hard boiled and cut into 8 parts each)
Directions
1. Combine ingredients using dough hook and knead for 10 mins to form a smooth dough. Cover with damp cloth and rest for 15 mins.
2. Sprinkle flour onto worktop. Roll the dough into long rectangular and into a long roll.
3.Cut rolled dough into small pieces and roll each cut into round disc.
4. Place 1 tbsp of curry potatoes fillings and fold into half. Press and seal the edges with fingers. Use fork to make imprints on the seal edges.
5. Deep fry till brown and drain the oil.
2. Sprinkle flour onto worktop. Roll the dough into long rectangular and into a long roll.
3.Cut rolled dough into small pieces and roll each cut into round disc.
4. Place 1 tbsp of curry potatoes fillings and fold into half. Press and seal the edges with fingers. Use fork to make imprints on the seal edges.
5. Deep fry till brown and drain the oil.
Green Tea Cotton Cake
I was so attracted to Julynn Tan's post of her Matcha Condensed Milk Cake in Facebook (very nice green color) and also My Mind Patch post of her Condensed Milk Cake, so I decided to cross reference both recipes to bake using Green Tea Powder. The result was amazing (though the green wasn't the bright green I wanted)! The cake did not shrink badly, the top did not crack, the cake did not collapse and there was no thick layer at the bottom (which I always had these problems). I can taste the fragrance of green tea in the cake and the texture was soft and well risen. Great instructions from My Mind Patch to bake the cake at different temperature ie 170 Deg C with only upper heating for 30 mins and 150 Deg C with upper and lower heating for another 20 mins (I reduced the timing as my portable oven is usually hotter than conventional oven). I also learned about banging the baking tin 3 times to prevent the cake from over shrinking during cooling period. Will definitely bake more of this cake (with different flavors) :)
Recipe with modifications:
Ingredients
4 egg yolks (small eggs)
1 whole eggs (small egg)
35g salted butter (melted)
40g cake flour (I used Top flour)
10g Green Tea Powder
50g condensed milk
4 egg whites
50g sugar
1 whole eggs (small egg)
35g salted butter (melted)
40g cake flour (I used Top flour)
10g Green Tea Powder
50g condensed milk
4 egg whites
50g sugar
Directions
1. Line baking tin with parchment paper at the base.
2. Mix eggs and set aside.
3. Melt butter in microwave and add sifted flour mixture (cake flour and green tea powder). Fold to mix with a spatula.
4. Add in the condensed milk to combine.
5. Add the above to eggs mixture and mix till well combine.
6. Beat egg white till frothy for 30 seconds. Add in the sugar, in 3 batches and beat the meringue till almost stiff peak (the meringue has a slight dip at the tip).
7. Scoop 1/3 of the meringue into the yolk batter. Fold to mix.
8. Pour the yolk batter back to the remaining meringue and fold into a smooth batter.
9. Pour the batter into the baking tin and lightly bang the tin on the table to remove any trapped air bubbles.
10.Bake in water bath in preheated oven at 170 Deg C with only upper heating for 30 mins. After 30 mins, reduce temperature to 150 Deg C with upper and lower heating for another 20 mins.If the cake turn brown too fast, cover with aluminium foil.
11.Remove the cake from the oven and drop the baking tin 3 times from a height about 5cm. This is to prevent the cake from over shrinking during cooling period.
12. Let the cake cool down for 10 mins (when the cake slightly shrink away from the wall of the cake tin). Run along the edge of the cake and remove the cake to a wire rack (to prevent accumulation of moisture at the base of the cake).
2. Mix eggs and set aside.
3. Melt butter in microwave and add sifted flour mixture (cake flour and green tea powder). Fold to mix with a spatula.
4. Add in the condensed milk to combine.
5. Add the above to eggs mixture and mix till well combine.
6. Beat egg white till frothy for 30 seconds. Add in the sugar, in 3 batches and beat the meringue till almost stiff peak (the meringue has a slight dip at the tip).
7. Scoop 1/3 of the meringue into the yolk batter. Fold to mix.
8. Pour the yolk batter back to the remaining meringue and fold into a smooth batter.
9. Pour the batter into the baking tin and lightly bang the tin on the table to remove any trapped air bubbles.
10.Bake in water bath in preheated oven at 170 Deg C with only upper heating for 30 mins. After 30 mins, reduce temperature to 150 Deg C with upper and lower heating for another 20 mins.If the cake turn brown too fast, cover with aluminium foil.
11.Remove the cake from the oven and drop the baking tin 3 times from a height about 5cm. This is to prevent the cake from over shrinking during cooling period.
12. Let the cake cool down for 10 mins (when the cake slightly shrink away from the wall of the cake tin). Run along the edge of the cake and remove the cake to a wire rack (to prevent accumulation of moisture at the base of the cake).
Saturday, September 5, 2015
Milo Cookies
Thanks to Sharon Lam for this recipe. I love Milo and always wanted to have it in my baking. These cookies are the chewy type instead of crunchy ones. I preferred the crunchy texture more but my kids love the chewiness. Overall, a good to keep recipe.
I am sending this post to Little Thumbs Up September 2015 - Milo organised by Bake for Happy Kids and my little favourite DIY.
Recipe with slight modification
Ingredients
190g plain flour
2 tsp baking powder
100g Milo
Pinch of salt
125g butter
110g brown sugar
1 egg
1 tsp vanilla essense
2 tsp baking powder
100g Milo
Pinch of salt
125g butter
110g brown sugar
1 egg
1 tsp vanilla essense
Directions
1. Mix all dry ingredients together (plain flour, baking powder, milo, salt)
2. Whisk eggs and sugar until creamy.
3. Add in egg and vanilla essence. Mix till well combined.
4. Add half the dry ingredients and fold well. Follow by the other half .
5. Scoop batter using 2 teaspoons (shape as round as possible) and drop onto baking tray, leaving some space between (as it will expand while it bakes).
6. Bake for 10 mins and transfer to wire rack to cool completely.
2. Whisk eggs and sugar until creamy.
3. Add in egg and vanilla essence. Mix till well combined.
4. Add half the dry ingredients and fold well. Follow by the other half .
5. Scoop batter using 2 teaspoons (shape as round as possible) and drop onto baking tray, leaving some space between (as it will expand while it bakes).
6. Bake for 10 mins and transfer to wire rack to cool completely.
Mini Egg Cuppies 鸡蛋糕
I am a Egg Cuppies (鸡蛋糕 ) lover and when I came across this recipe from Angela Seah, I was so excited to try it out. It was indeed an easy recipe with no hassle steps like egg white separation and folding method. I could make quite alot from the quantities of ingredients used. When they came out from the oven, the top were a little crusty and once cooled down, it softened as what I expected and preferred. Overall, I like it very much but if they were more eggy, it would be perfect.
Ingredients
3 large eggs
170g sugar
Pinch of salt
160g plain flour
1 tsp baking powder
30g oil
170g sugar
Pinch of salt
160g plain flour
1 tsp baking powder
30g oil
Directions
1. Whisk eggs, sugar and salt until light and fluffy.
2. Sieve in the flour and baking powder till well combined (I used hand balloon whisk).
3. Then add in oil and fold with spatula until well mixed.
4. Scoop batter into fillers and fill 3/4 full.
5. Bake at preheated oven 170 Deg C for 15-20 mins or until top lightly brown.
2. Sieve in the flour and baking powder till well combined (I used hand balloon whisk).
3. Then add in oil and fold with spatula until well mixed.
4. Scoop batter into fillers and fill 3/4 full.
5. Bake at preheated oven 170 Deg C for 15-20 mins or until top lightly brown.
Thursday, September 3, 2015
No Bake Strawberry Cheesecakes - Orders (Sep 2015)
Thanks to Felicia for the orders of No Bake Strawberry Cheesecakes on 4 Sep 2015
Wednesday, September 2, 2015
Chocolate Chips Cookies & Muffins - Orders (Sep 15)
Baked Chocolate Chips Cookies for Teacher's Day Gift
Also did these Hershey's Chocolate Muffins
Thanks to Felicia for the above orders for her kid's Teachers..
Wednesday, August 26, 2015
Pork Floss Toast
I just cannot resist Pork Floss so I baked these toast for Teatime. Simple and Yummy :) !
Ingredients
Slices of bread
Pork Floss
Condensed Milk
Pork Floss
Condensed Milk
Directions
1. Spread condensed milk on bread.
2. Top with Pork floss and baked for 10 mins.
Monday, August 10, 2015
Ham & Cheese Croissants
Whipping up these Ham & Cheese Croissants for supper!
Ingredients
Puff Pastry
Ham (cut into small squares)
Sliced Cheddar cheese (cut into small squares)
1 Egg (beaten)
Ham (cut into small squares)
Sliced Cheddar cheese (cut into small squares)
1 Egg (beaten)
Directions
1. Cut Puff pastry into triangles.
2. Place Ham and cheese on the wider part of triangular.
3. Roll the pastry (from the ham & cheese towards the sharp end).
4. Brush with egg wash and bake till pastry brown.
2. Place Ham and cheese on the wider part of triangular.
3. Roll the pastry (from the ham & cheese towards the sharp end).
4. Brush with egg wash and bake till pastry brown.
Saturday, August 1, 2015
Coconut Tarts
I missed those days eating these Coconut Tarts when I was a kid. I came across this recipe from Sifu Kenneth Goh and decided to give it a try since the steps seem easy. However I made a mistake of adding 1 whole egg instead of 25g (half egg) as indicated and my dough became very sticky. I have to add more flour in order to get to the consistent I felt right. I have modified the recipe a little (from Sifu Kenneth & Aunty Yochana) for my future bake.
Some modifications made:
Ingredients
Dough
100g chilled butter
200g plain flour (sifted)
40g icing sugar (sifted)
1 small egg (light beaten)
1/2 vanilla essence
Fillings
180g grated coconut
75g melted butter
100g sugar
2 eggs
1.5 tbsp condensed milk
200g plain flour (sifted)
40g icing sugar (sifted)
1 small egg (light beaten)
1/2 vanilla essence
Fillings
180g grated coconut
75g melted butter
100g sugar
2 eggs
1.5 tbsp condensed milk
Directions
1. In a big mixing bowl, put the butter cubes and sifted flour. Use finger tips to rub until it become crumbly. Add in sifted icing sugars and continue to rub until well mix.
2. Add lightly beaten egg and vanilla essence, mix slowly until it becomes a dough (a little sticky).
3. Dust the tarts mould with flour. Take a ball of dough and press against the sides and make it as even as possible. Use a knife to cut off the excess dough and use a fork to make some holes to let any trapped air to escape.
4. In a big mixing bowl, mix all coconut fillings using a spoon or spatula until well mix.
5. Scoop the fillings into the tart shells and bake at 180 Deg C for 20-25 mins or till golden brown.
2. Add lightly beaten egg and vanilla essence, mix slowly until it becomes a dough (a little sticky).
3. Dust the tarts mould with flour. Take a ball of dough and press against the sides and make it as even as possible. Use a knife to cut off the excess dough and use a fork to make some holes to let any trapped air to escape.
4. In a big mixing bowl, mix all coconut fillings using a spoon or spatula until well mix.
5. Scoop the fillings into the tart shells and bake at 180 Deg C for 20-25 mins or till golden brown.
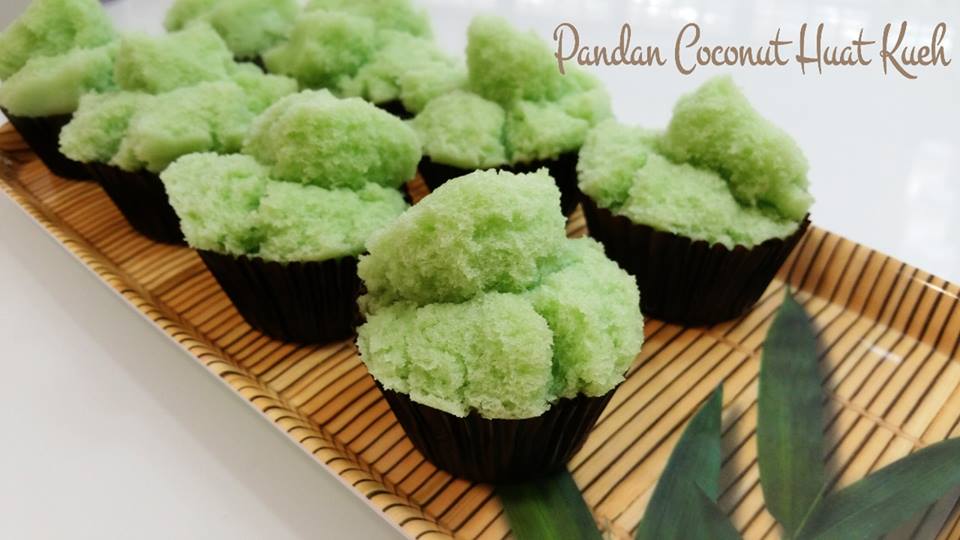
Pandan Coconut Huat Kueh
Thanks to Linda Ling for this recipe and my Pandan Coconut Huat Kueh really huat beautifully! Very fragrant with pandan and coconut flavour. So easy and quick to make too!
Some modifications made:
Ingredients
250g self raising flour
1 tsp baking powder
2 tbsp corn oil
A pinch of salt
125g castor sugar
270ml coconut milk (original 250ml but I bought a can with 270ml)
1 tsp pandan paste (I did not use pandan leave to make the juice)
1 tsp baking powder
2 tbsp corn oil
A pinch of salt
125g castor sugar
270ml coconut milk (original 250ml but I bought a can with 270ml)
1 tsp pandan paste (I did not use pandan leave to make the juice)
Directions
1. Mixed all ingredient together (sticky batter) and fill 3/4 of fillers.
2. Steam for 20-25 mins under high flame.
Sunday, July 26, 2015
Mango Yoghurt Cupcakes
I was keen to try this recipe from one of the members, Ms Janice Kang from We ❤f ❤ Recipes. Steps were easy and the texture was soft and cottony. I have made some modifications to my own preference.
1) I did 2 lots at a go as I want to give some to my neighbours (they are always my bakes supporters)
2) I have used 200g sugar but felt too sweet so will reduce to 180g instead the next time I bake.
3) I used Mango Yoghurt as I cannot find Raspberry Yoghurt.
4) I added more milk (instead of 6 tbsp as per original recipe)
5) I used the electric mixer to mix the flour and milk but I felt better to stick with Janice's method to use spatula.
Ingredients
250g butter
180g sugar (I have reduced by 20g)
100g Premium Swiss Mango Yoghurt
6 eggs
300g plain flour
3 tsp baking powder
1 tsp vanilla essence
8 tbsp fresh milk
180g sugar (I have reduced by 20g)
100g Premium Swiss Mango Yoghurt
6 eggs
300g plain flour
3 tsp baking powder
1 tsp vanilla essence
8 tbsp fresh milk
Directions
1. Beat butter & sugar till creamy & fluffy.
2. Add in Mango yoghurt and mix well
3. Add eggs one at a time and mix till well combined.
4. Add in 1/2 qty of flour, followed by 1/2 qty of milk using mixer. Add in the balance flour and milk, mix well swiftly with rubber spatula.
5. Spoon batter into paper cup around 70% filled.
6. Bake at 180 deg C till golden brown.
2. Add in Mango yoghurt and mix well
3. Add eggs one at a time and mix till well combined.
4. Add in 1/2 qty of flour, followed by 1/2 qty of milk using mixer. Add in the balance flour and milk, mix well swiftly with rubber spatula.
5. Spoon batter into paper cup around 70% filled.
6. Bake at 180 deg C till golden brown.
Saturday, July 18, 2015
Steamed Colour Cakes
I saw this recipe from Victoria Moon Kua and love the pretty color layers. Though the steps seem easy but I find the folding part was a challenge as my cake turned out not as spongy like Victoria. I could have over mixed and thus deflated the batter. Also, the batter was too much for the baking tin I used, I only managed to do 3 color layers. Overall it tasted yummy and I even have 2 pretty models for my bakes.
Ingredients
(A)
1 tsp baking powder
250g cake flour
25g full cream milk powder
25g corn flour
(B)
100g fresh milk
50g butter (melted)
(C)
1 tsp baking powder
250g cake flour
25g full cream milk powder
25g corn flour
(B)
100g fresh milk
50g butter (melted)
(C)
500g egg white
250g sugar
1/2 tsp salt
1 tsp strawberry paste
1 tsp coffee paste
1 tsp pandan paste
250g sugar
1/2 tsp salt
1 tsp strawberry paste
1 tsp coffee paste
1 tsp pandan paste
Directions
1. Grease and line 8 inch square pan with baking paper.
2. Sift A together and set aside.
3. Mix B together.
4. Whip C till stiff peak.
5. Fold A into C in a few addition.
6. Blend in B.
7. Divide batter into 4 equal portions and add in paste into individual portions (1 layer without any paste).
8. Steam each layer for 7 mins on high heat and at last layer, steam for 10 mins at medium heat.
2. Sift A together and set aside.
3. Mix B together.
4. Whip C till stiff peak.
5. Fold A into C in a few addition.
6. Blend in B.
7. Divide batter into 4 equal portions and add in paste into individual portions (1 layer without any paste).
8. Steam each layer for 7 mins on high heat and at last layer, steam for 10 mins at medium heat.
Wednesday, July 15, 2015
Cranberry Cream Cheese Buns
I was so eager to try out making my own Cranberry Cream Cheese Buns and thanks to Sifu Kenneth Goh for this step by step recipe. I have made some modifications for my own reference.
The first lot of bakes, I did not place the additional baking tray on top so it risen like a normal shape bread (bloated). It was indeed a great idea to place the baking tray on top and it came out nice, like store bought Cranberry Cream Cheese Buns (self flattered). Texture was soft and cream cheese blends well. Felt great achievement for this bake.
Ingredients
300g bread flour
200g top flour
20g milk powder
100g castor sugar
5g salt
1 packet of instant yeast (11g)
1 egg
250g lukewarm water
60g cranberries (soaked)
Filling
250g cream cheese
150g condensed milk
200g top flour
20g milk powder
100g castor sugar
5g salt
1 packet of instant yeast (11g)
1 egg
250g lukewarm water
60g cranberries (soaked)
Filling
250g cream cheese
150g condensed milk
Directions
1. Put all dry ingredients in mixer and use a tablespoon to stir well. Make a well in the centre and crack the egg and pour lukewarm water in the centre. Use tablespoon to stir until a sticky dough is form and beat with mixer hook at medium speed until dough is smooth (about 5 mins). Add in butter and beat using high speed till the dough leaves the side if the mixing bowl (about 10 mins). Add in cranberry and beat till well mixed.
2. Transferred to a greased bowl and let it proof till Triple in size (about 40 mins). Cover with cling wrap and a wet towel.
3. While the dough is proofing, cream the cream cheese until light and fluffy. Add in condensed milk and beat until well combined. Chilled in the fridge till the dough is ready to use.
4. Once the first proofing done, take a small portion (or your desired size), dust with some flour and flatten the dough. Put 1 tbsp of cream cheese on the dough and seal the edges. Use the rolling pin to flatten the dough as flat and round. Let it proof double in size, leaving adequate space for expansion.
5. Prepare another baking tray, grease the base with butter and place base on top of dough so that the dough will be flatten during baking.
6. Baked in preheated oven at 190 Deg C for about 15 mins or until top and bottom of bread turn brown.
2. Transferred to a greased bowl and let it proof till Triple in size (about 40 mins). Cover with cling wrap and a wet towel.
3. While the dough is proofing, cream the cream cheese until light and fluffy. Add in condensed milk and beat until well combined. Chilled in the fridge till the dough is ready to use.
4. Once the first proofing done, take a small portion (or your desired size), dust with some flour and flatten the dough. Put 1 tbsp of cream cheese on the dough and seal the edges. Use the rolling pin to flatten the dough as flat and round. Let it proof double in size, leaving adequate space for expansion.
5. Prepare another baking tray, grease the base with butter and place base on top of dough so that the dough will be flatten during baking.
6. Baked in preheated oven at 190 Deg C for about 15 mins or until top and bottom of bread turn brown.
Tuesday, July 14, 2015
Cream Cheese Tarts

Thanks to Ms Chan Lai San for this excellent recipe. I was contemplating if I should buy Blueberries pie filling as I knew I will not be able to finish up the whole can. Instead I used Strawberry Jam (since I have it in my fridge). The effect was equally good and I am satisfied with the swirl design. However, I had more tart shells then the cream cheese fillings, so I will add the whole block of cream cheese instead (250g) the next time I bake. I am so happy that my kids love them.
Ingredients
Pastry
225g plain flour
100g icing sugar
100g butter
1 egg
Filling
200g cream cheese (to use 250g next time)
20g butter
40g castor sugar
1 egg
20g whipping cream
15g plain flour
Blueberries pie filling (I used strawberry jam)
225g plain flour
100g icing sugar
100g butter
1 egg
Filling
200g cream cheese (to use 250g next time)
20g butter
40g castor sugar
1 egg
20g whipping cream
15g plain flour
Blueberries pie filling (I used strawberry jam)
Directions
1. Using a electric mixer, combine flour, butter, sugar and egg until a smooth dough is formed. Put in a plastic bag and chill in refrigerator for 30 mins.
2. When chilled, take a ball of dough and place into a floured tart mould. Press the dough up to the side of the mould and trim off the edges. Prick the base with a fork and bake in a preheated oven at 190 Deg C for 5 mins. Allow to cool.
3.Beat cream cheese, butter and sugar until light and smooth. Add egg and mix until well blended. Mix in whipping cream and mix till combined. Lightly add in flour and mix till well incorporated.
4. Spoon the mixture onto the pre-baked tart shells. Add a little jam (I mixed a few drop of little water to the jam) and drop on top of mixture. Use a satay stick to swirl to create a marble effect.
5. Bake tarts at 200 Deg C for 10 mins. Remove from oven to cool and chilled in fridge before serving.
2. When chilled, take a ball of dough and place into a floured tart mould. Press the dough up to the side of the mould and trim off the edges. Prick the base with a fork and bake in a preheated oven at 190 Deg C for 5 mins. Allow to cool.
3.Beat cream cheese, butter and sugar until light and smooth. Add egg and mix until well blended. Mix in whipping cream and mix till combined. Lightly add in flour and mix till well incorporated.
4. Spoon the mixture onto the pre-baked tart shells. Add a little jam (I mixed a few drop of little water to the jam) and drop on top of mixture. Use a satay stick to swirl to create a marble effect.
5. Bake tarts at 200 Deg C for 10 mins. Remove from oven to cool and chilled in fridge before serving.
Saturday, July 11, 2015
Lemon Blueberries Cupcakes
It was quite sometime that I did my bakes (has been busy working). Thanks to Michelle Marie Mower for this excellent recipe which I found in her Facebook post. My bakes were not as perfect compared to hers as my blueberries sank even though I dusted with flour. I actually topped more blueberries in the middle of baking in order to see part of blueberries...haha! Soft texture and yummy!
Recipe adapted from Michelle Marie Mower
Ingredients
280g Self Raising Flour
1/2 tsp salt
1/2 tsp salt
200g sugar
4 large eggs
1/2 tsp vanilla essence
Lemon Zest
8 tsp Lemon Juice
1box blueberries
Salt
Directions
1. Wash blueberries with salt and set aside to dry. Pat with kitchen towel (completely dry) and dust with flour.
2. Sieve flour and salt, set aside.
3. Cream butter and sugar till creamy. Add eggs one at a time, beat well after each addition until mixture is light and fluffy.
4. Add 1/2 tsp vanilla essence, lemon zest and mix well.
5. Add in 2 tsp of lemon juice at a time and mix until well combined.
6. Fill batter slightly more than 1/2 in fillers. Top with blueberries.
7. Bake at 160 Deg C for 20mins or until top turn brown.
2. Sieve flour and salt, set aside.
3. Cream butter and sugar till creamy. Add eggs one at a time, beat well after each addition until mixture is light and fluffy.
4. Add 1/2 tsp vanilla essence, lemon zest and mix well.
5. Add in 2 tsp of lemon juice at a time and mix until well combined.
6. Fill batter slightly more than 1/2 in fillers. Top with blueberries.
7. Bake at 160 Deg C for 20mins or until top turn brown.
Subscribe to:
Posts (Atom)