Sunday, August 26, 2012

Topo Map Love Cake


Since early this morning, I have been making alot of chocolate chips cookies for the orders for Teachers' Day. Though tired, I still decided to bake this pretty Topo Map Love Cake. I was happy that the outcome of this cake was splendid! The layers of colors made an artistic design to the cake. I have adapted this cake from Table for 2 but modified some of the ingredients and the result was equally great. Reducing sugar to 200g and replaced Cocoa powder with Milo. The cake was really soft and have the nice pandan flavour. 

Ingredients

250g butter
200g sugar (original 250g)
5 eggs
300g cake flour +1 tsp baking powder
125ml evaporated milk
1 tsp vanilla extract
1 tsp pandan paste
Cocoa powder (I used Milo) for creating the topo lines

Directions

1. Cream butter and sugar until pale and fluffy.
2. Beat in eggs, one by one, beating well after each addition.
3.Sift half the flour into butter mixture and beat on low speed until well combined.
4. Mix in evaporated milk until well combined.
5. Sift the balance of flour into the mixture and beat on low speed until well combined.
6. Divide the batter to two. Mix vanilla extract to one part and pandan paste to the other.
7. Preheat oven 180C. Prepare 20cm X 20cm pan, lined the base & grease the side.
8. Spread 1/2 the pandan batter into pan. Level it.
9. Evenly sift a thin layer of Milo over.
10. Very gently dollop half of the other colour over and gently level it. Repeat the sifting of milo.
11. Repeat layering with both colours, with the final layer clean(no milo on top).
12. Bake for 55 mins or until toothpick comes out clean.

Saturday, August 25, 2012

Banana Cream Pie

I got this recipe from Joy of Baking and was so eager to bake it after watching the video clip. The steps seem no hassle and so I decided to give it a try. Somehow, things didn't turn out the way it should be. Firstly, I have used the wrong sugar for the crust (Castor sugar instead of icing sugar). Secondly, as I did not have a food processor, I used the mixer to mix the ingredient for shortbread crust and due to over beating, the crust became creamy instead of crumbs. Thirdly, I used the wrong baking pan(without removable bottom) and had difficulty taking out the crust after baking.

It was easy to make the cream and fun to assemble the whole pie. The pie tasted good with the biscuit-like crust and the sweetness of the bananas added a nice finishing touch to this pie. With my Mother-In-Law and glutton-like kids, the pie was gone in 15mins. If I have not made those 3 mistakes, this pie would be a masterpiece.

Ingredients

Shortbread Crust
130g plain flour
35g icing sugar
1/8tsp salt
113g cold unsalted butter(cut into pieces)
Pastry Cream
300ml milk
1tsp vanilla extract
3 large egg yolks
50g Castor sugar
20g plain flour
20g corn flour

2-3 large bananas, peeled sliced


Directions

Shortbread Crust
1. Grease 20 - 23 cm tart pan with a removable bottom.
2. Mix flour, sugar, and salt to combine. Add the butter and mix till the pastry starts to come together and form clumps.
3. Place the pastry in the prepared tart pan and, using your fingertips, evenly press the pastry onto the bottom and up the sides of the pan. (Can use the back of a spoon to smooth the surface of the pastry.)
4. Pierce the bottom of the crust with the tines of a fork. (This will prevent the pastry crust from puffing up while it bakes.)
5. Cover and place the pastry crust in the freezer for 15 minutes to chill. (This will help prevent the crust from shrinking while it bakes.)
6. Preheat oven 220 degrees C and bake until the crust is golden brown, about 13 - 15 minutes.
7. Remove from oven and place on a wire rack to cool.

Pastry Cream
1. In a medium-sized heatproof bowl, mix the sugar and egg yolks together.
2. Combine flour and corn flour together and then add to the egg mixture, mixing until you get a smooth paste.
3. In a saucepan bring the milk to just boiling (just until milk starts to foam up.)
4. Remove from heat and add slowly to egg mixture, whisking constantly to prevent curdling.
5. Then pour the egg mixture into a medium saucepan and cook over medium heat until boiling, whisking constantly.
6. When it boils, whisk mixture constantly for another 30 - 60 seconds until it just becomes thick. Remove from heat and stir in vanilla extract.
7. Pour into a clean bowl and immediately cover the surface with plastic wrap to prevent a crust from forming. Cool to room temperature before using. If not using right away refrigerate until needed, up to 3 days. Whisk or stir before using to get rid of any lumps that may have formed.

To Assemble
1. Spread pastry cream evenly over cooled crust.
2. Top with sliced bananas.

Note: If Pie is not consumed immediately, suggest to put a glaze over the banana from turning black. Either glaze with boiled jam or sugar syrup.

Sunday, August 19, 2012

Milo Donut Cake

Aren't these donut cakes cute? I have decided to make these cute donut cakes with the butter cake recipe and adding cocoa powder to make a pretty colour to it. When I was about to add cocoa powder, then I realised I have run out of cocoa powder. Looking into the cupboard for an alternative, I decided to use Milo instead. And that's how these Milo donut cakes were created. The texture is soft but cannot really taste the Milo, perhaps have to add more Milo the next time.


Ingredients

250g butter
165g Castor sugar
205g self raising flour (sifted)
5 eggs
1.5 tsp vanilla essence
30g Milo

Directions

1. Mix butter and Castor sugar until white.
2. Add eggs one at a time and add vanilla essence. Mix evenly.
3. Add flour and mix using low speed.
4. Add Milo to half portion of the batter and scoop the 2 different batter into piping bag respectively.
5. Grease the donut tray with butter. Pipe batter into donut tray alternately.
6. Bake at 180 degree C for 15-20mins.

Saturday, August 18, 2012

Yummy Peach Cake

I have adapted this recipe from Maria's Cherry Cake and modified it with Peach as I am not a lover of cherry. I have used self-raising flour in replaced with all purpose flour and baking powder. Also reduced sugar further to 110g and the sweetness is just perfect. The look resembled the Fruit Pastry Cake but this cake is much softer and lighter. Overall, fruity and yummy! 

Ingredients

100g butter
110g icing sugar
1/2 tsp vanilla extract
2 eggs
150g self-raising flour (sifted)
Sliced syrup peaches
icing sugar for dusting

Directions

1. Preheat oven to 170C. Prepare a 9 inch pan and grease with butter.
2. Cream butter and icing sugar until light and fluffy.
3. Beat in eggs gradually.
4. Add in vanilla extract.
5. Fold flour into beaten butter.
6. Spread out mixture into prepared pan and arrange sliced peaches.
7. Bake for 35 mins or until golden. When cake has cooled, dust with icing sugar before serving.

Note: If you are using smaller baking pan, do remember to fill the batter up to 1/2 the pan, so it will rise just nice to the rim.

Friday, August 10, 2012

Blueberry Crumble Cupcakes

http://www.tastebook.com/recipes/3377165-Blueberry-Crumble-Cupcakes
This Saturday morning was an early day for me, waking up at 8.00am (which I usually don't) and getting ready to bake these cupcakes as breakfast for my kids. Just in 45mins, we were all enjoying the hot and yummy cupcakes fresh from the oven. Felt extremely wonderful having such delicious cakes for a good start of the day!  

Ingredients

Crumble topping:
20g cold butter
20g caster sugar
20g cake flour
10g ground almond (optional)

Batter:
125g butter, room temperature
70g caster sugar
2 large eggs
1/2tsp vanilla extract
100g cake flour
1tsp baking powder
2tbsp milk
80g fresh blueberries (some dust with some flour)

Directions

1. Make crumble topping. Combine ingredients in a bowl and mix with fingers until mixture resembles coarse breadcrumbs. Refrigerate until needed.
2. Preheat the oven to 180C. Put 8 paper cases in a muffin pan.
3. Put the butter and sugar in a mixing bowl, and beat together until light and fluffy.
4. Add egg one at a time, combine well.
5. Add in the flour and milk alternately, fold till well combine and lastly add in vanilla extract.
6. Add in blueberries, mix well.
7. Spoon the mixture into the paper cases. Top with few blueberries, then sprinkle crumble topping over.
8. Bake the cupcakes in the oven for 25-30mins, or until risen and firm to the touch.
9. Transfer to a wire rack and let cool.

Wednesday, August 8, 2012

Flourless Blueberry Cheesecake


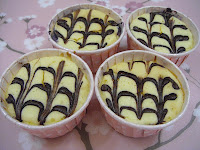
I was so enthusiastic to bake these cheesecakes as it's a flourless and gluten-free dessert. The steps were simple and without much effort, I had these cheesecakes done. The original recipe used baking tins but I decided to make it in small cup fillers (8pcs) and also decorated with melting chocolate pattern on top (haha..can tell my piping skills not that good but will practice more).  The texture were smooth and light, tasted so nice together with the digestive biscuits. I felt it would taste even better to mix some blueberry filling to the fresh blueberries so it will enhance the overall texture.
http://www.tastebook.com/recipes/3375384-Flourless-Blueberry-Cheesecake

Ingredients

  • 100g digestive biscuits (original 90g)
  • 45g butter (melted)
  • 250g cream cheese (original 225g)
  • 65g caster sugar (original 75g)
  • 1/4 tsp vanilla extract
  • 2 eggs (lightly beaten)
  • 100g blueberries (original 90g)
  • some melting chocolate

Directions

1. Preheat oven at 180 deg C.
2. Crush digestive biscuits until quite fine. Mix crushed biscuits with melted butter and press down into base of cup fillers. Spread the blueberries over the base and allow chill in the fridge while you make the toppings.
3. Beat cream cheese, sugar, vanilla extract and eggs together until smooth and creamy. Pour over the top of the blueberries and knock the filler on the table to ensure the batter is evenly spread.
4. Microwave melting chocolate and put into piping bag. Pipe lines and then use a chopstick to go across the line.
5. Bake in water bath for 20-30 mins.
Bake in water bath or double-boil method means a pan of water placed into an oven. The hot water provides a constant, steady heat source and ensures even baking.

Sunday, August 5, 2012

Healthilicious Pumpkin Cake

This recipe has been published in 

When I saw the theme for Aspiring Bakers #22: Lightened Up Cakes (August 2012) hosted by Qi Ting of A Dessert Diet, I was really keen and excited to participate for my very first time. I was cracking my head for a less fat and less sugar recipe as per the theme requirement and so I decided to make this Healthilicious Pumpkin Cake (modify recipe from Nasi Lemak Lover). Mindful of the ingredients for my diabetic Mother-in-Law, so I cut down the sugar and oil for this recipe. The result was fantastic, the cake was not sweet, its soft and light. However, it lacked the pumpkin taste (even though I added 200g of pumpkin) but overall a healthy cake.


http://www.tastebook.com/recipes/3372216-Healthilicious-Pumpkin-Cake

Ingredients

  • 3 Eggs (medium)
  • 100g sugar (reduced 30g)
  • 200g Pumpkin (steamed & mashed)
  • 150g cake flour
  • 1/2 tsp Baking powder
  • 1/4 tsp Baking soda
  • 80g Corn oil (reduced 20g)
  • 1/2 tsp vanilla essence


Directions

1. Preheat oven to 160 degree C.
2. Sieve flour, baking powder & soda together. Sieve twice & set aside.
3. Beat eggs, sugar, vanilla & pumpkin till stiff/ribbon stage.
4. Fold in flour & mix well.
5. Add in corn oil & mix well till batter is shiny & flowing.
6. Pour batter into cup fillers or loaf pan. Sprinkle some chopped walnuts on top (optional).
7. Bake for 30mins.

Chocolate Wonders

Got to say this is the best chocolate cake that I ever ate (as I am not a chocolate person). Perhaps the melting chocolate made an amazing difference to the overall taste. Anyone can make this easy peasy cake. There is something that you need to know, which was my mistake when doing the first tray. I filled the batter full but didn't take note to cover the batter over  the centre piece of the donut mold. It came out with a see-through hole and later I have problem putting in the melted chocolate which then flowed out. So for this lot, I actually put in the melted chocolate and then place them in the fridge for it to harden (if not, when you lift up the cake, the melted chocolate will leak out). My 2nd tray onwards were all then with a sealed based.  Overall, it was a fun experience and you should try it!   


Ingredients

  • 150g butter
  • 120g sugar (I reduced from 135g)
  • 200g self raising flour (sifted)
  • 3 eggs
  • 7tbsp milk (I added 1 more tbsp)
  • 40g cocoa powder (I reduced from 55g)
  • some melted chocolate

Directions

1. Preheat oven at 180 deg C, grease the donut trays.
2. Whisk butter, sugar, eggs, milk, flour and cocoa until smooth and well-mixed.
3. Transfer batter into piping bag. Pipes batter into donut trays till full* and bake for about 18 to 20 minutes or until well-risen and springy to the touch.
4. Transfer to a wire rack and turn upside down to let cool.
5. Microwave some melting chocolate. Pipe into the hole in each donut-shaped cakes.
6. Put into fridge to harden the melted chocolate.
*You need to spread the batter over the donut centre piece, so that it will seal the base.